Stacked Beef Enchiladas (AKA Mexican Lasagna)

This post may contain affiliate links. Read my full disclosure policy.
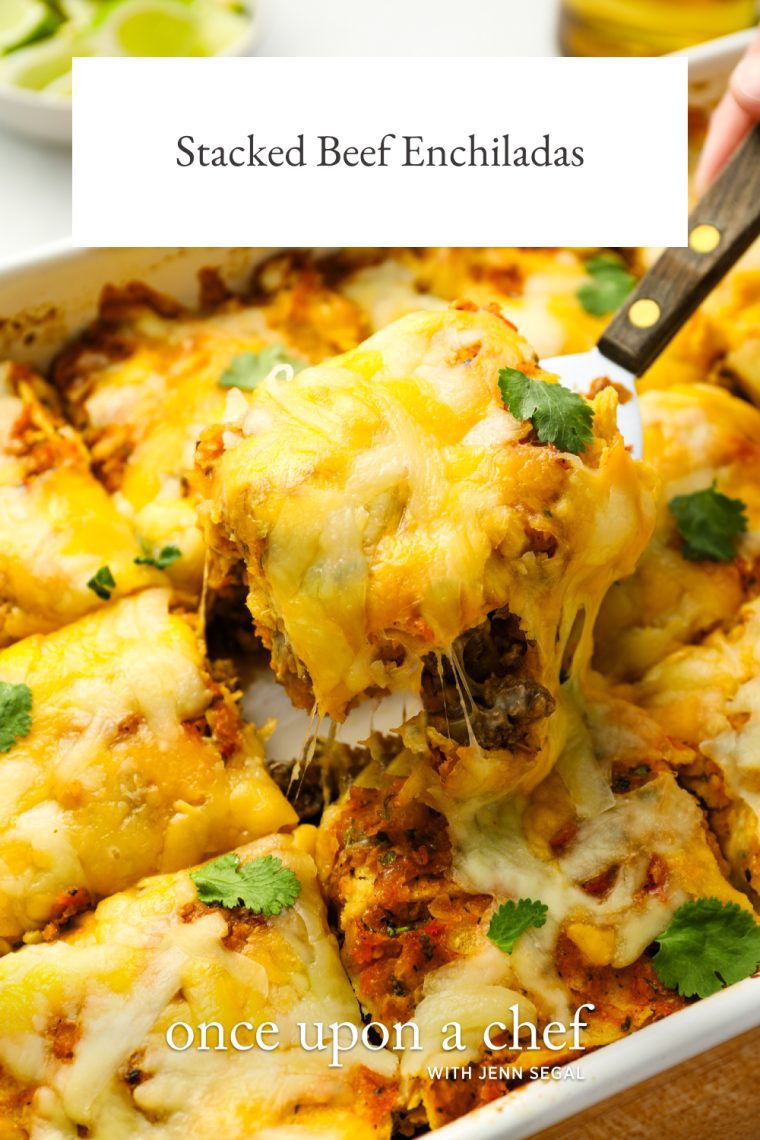
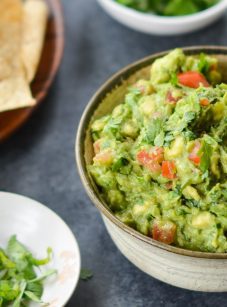
With layers of corn tortillas, spicy ground beef, salsa and cheese, this stacked beef enchilada casserole is a huge family-pleaser.
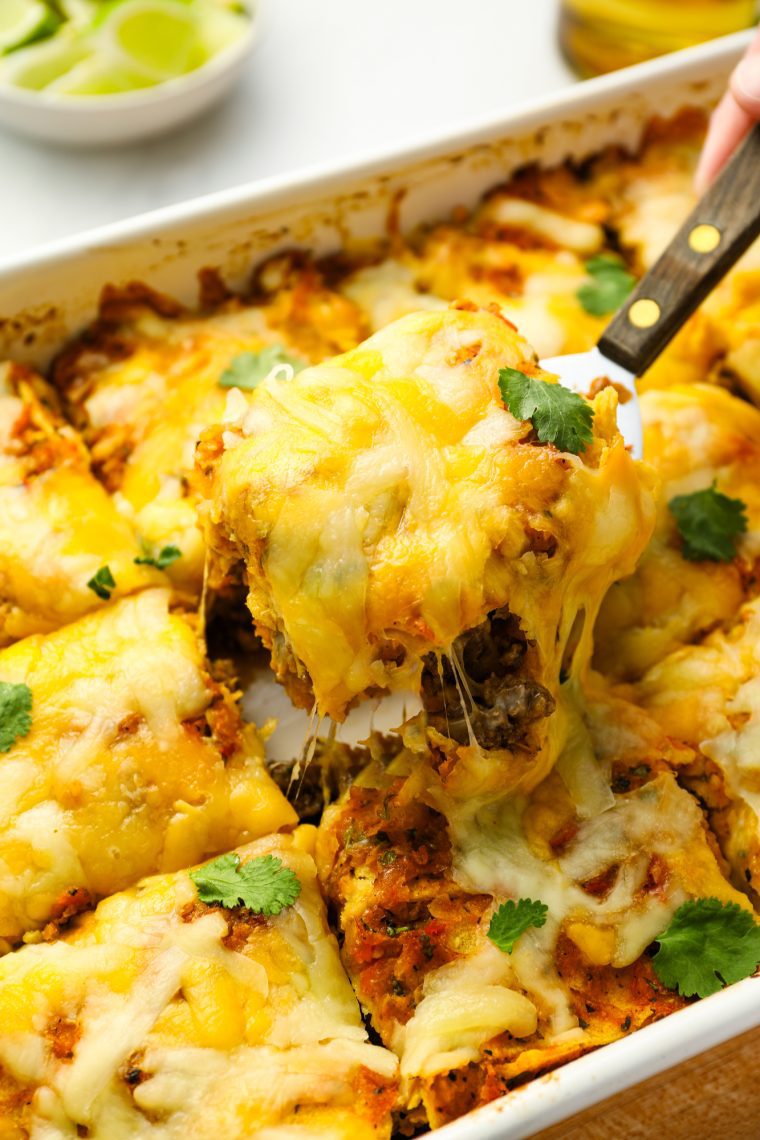
You know when you make a dish for the first time and your whole family loves it, and you’re thrilled because you’ve found a new recipe to add to your repertoire forever? That’s how I felt the first time I cooked these hearty stacked beef enchiladas. With layers of corn tortillas, spicy ground beef, roasted tomato salsa, and cheese, it’s a cross between traditional beef enchiladas and lasagna — yet easier to make than both. It’s a great make-ahead dish for a potluck or big family dinner. And if you prepare the sauce in advance, it’s doable on a weeknight, too.
Table of Contents
What You’ll Need To Make Stacked Beef Enchiladas
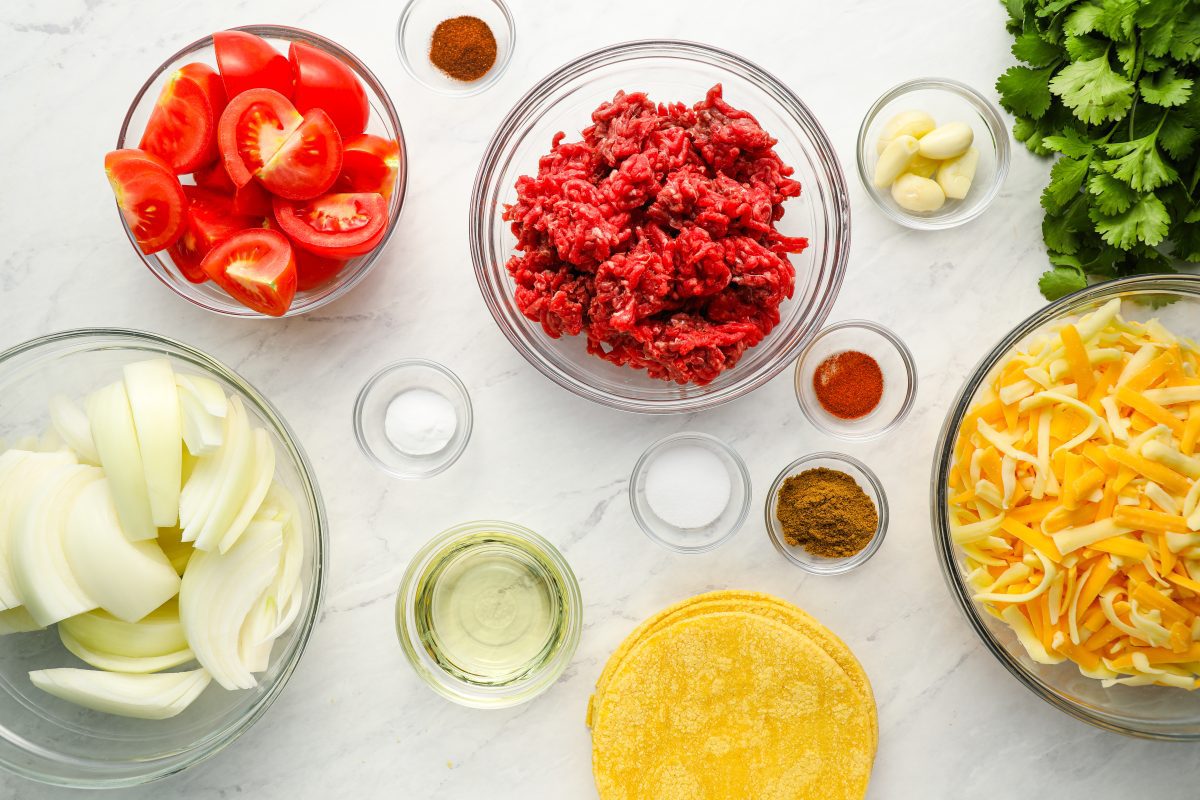
- Ground Beef: The main protein that fills the layers of the enchiladas. 90% lean beef is ideal for its lower fat content while still providing rich flavor (with extra lean beef, there is no need to drain the fat).
- Baking Soda: Used for tenderizing the beef.
- Tomatoes, Onions, Garlic: These ingredients are used to create a vibrant and rich sauce, essentially a roasted tomato salsa.
- Cumin, Cayenne Pepper, Chipotle Chili Pepper: This spice trio infuses the dish with earthy, spicy, and smoky notes, giving the enchiladas bold Mexican flavor.
- Cilantro: Adds a pop of herbal freshness and color.
- Yellow Corn Tortillas: The foundation for the stacked enchiladas, these tortillas are cut into quarters for easy layering.
- Mexican Blend Cheese: A mix of cheeses that includes cheddar and Monterey Jack, this blend melts beautifully, creating gooey, stretchy layers that bind the enchiladas together.
- Jump to the printable recipe for precise measurements
Step-by-Step Instructions
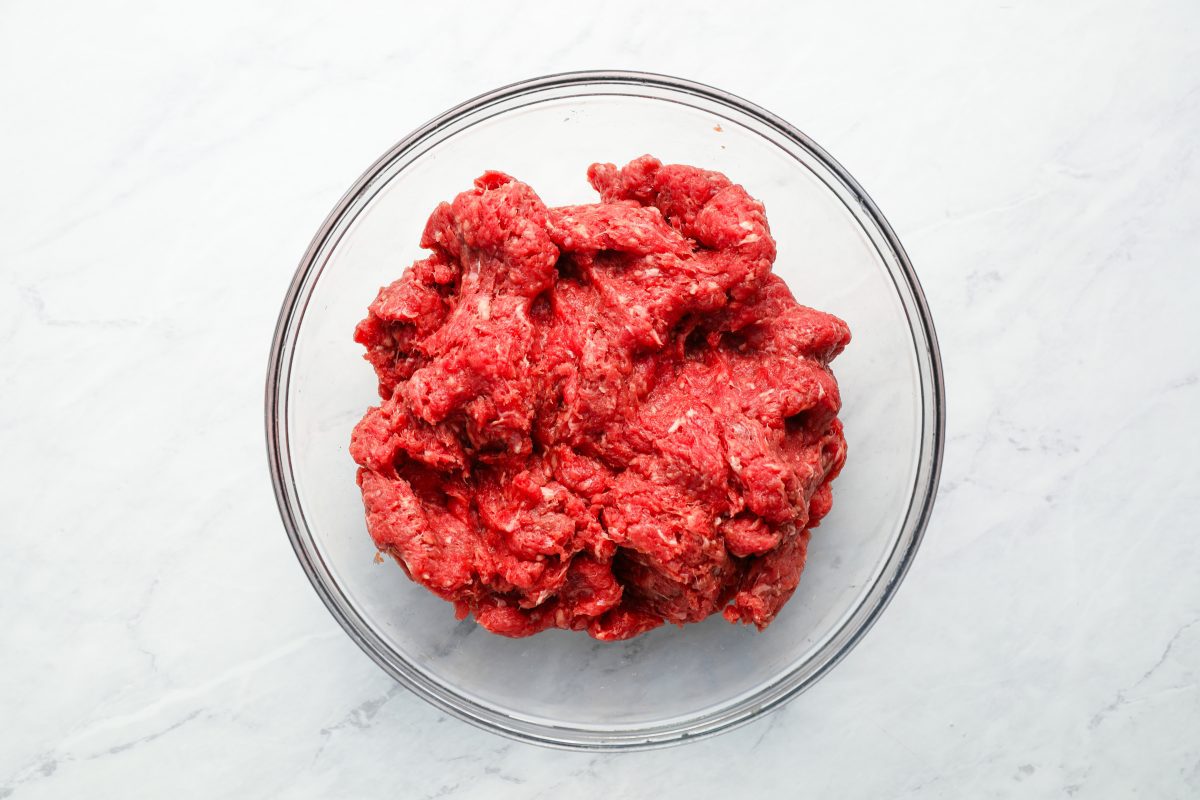
Step 1: Tenderize the Beef
To begin, mash the ground beef and the baking soda in a large bowl and let sit on the counter for about 20 minutes. The baking soda raises the pH of the meat, helping to lock in moisture and make the beef melt-in-your-mouth tender.
Step 2: Make the Sauce
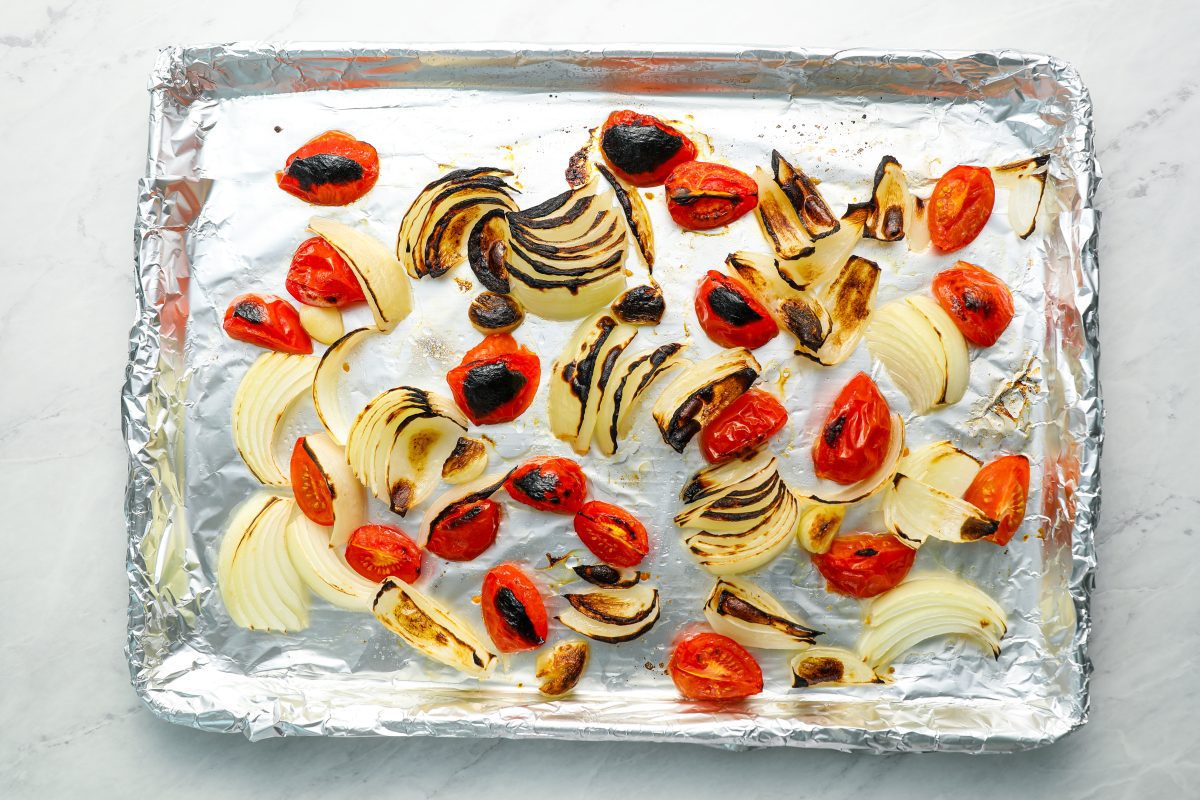
Toss the tomatoes, onions, and garlic with the vegetable oil directly on a foil-lined baking sheet.

Broil until softened and charred, 12 to15 minutes (if the vegetables are browning too quickly, give them a quick stir with a rubber spatula).
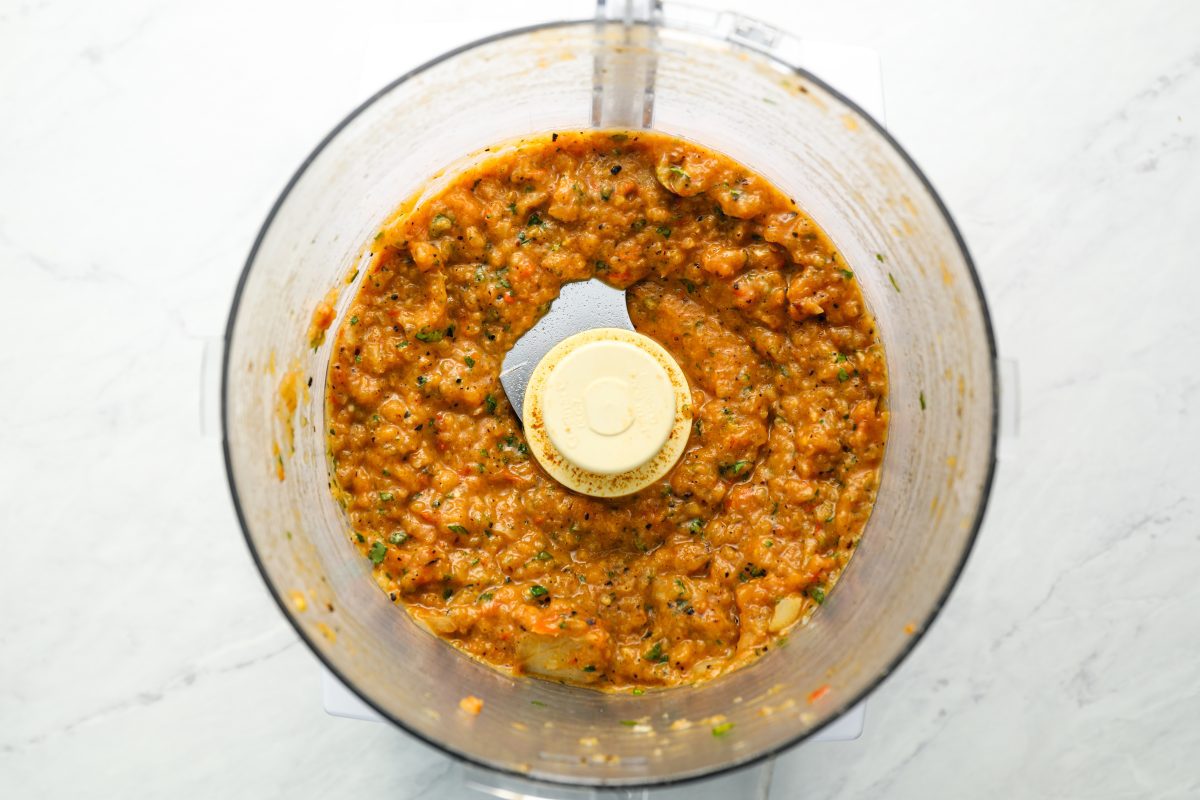
Transfer the vegetables and juices to a food processor fitted with the metal blade. Add the salt, cumin, and cayenne pepper and pulse until just slightly chunky — then toss in the cilantro leaves.
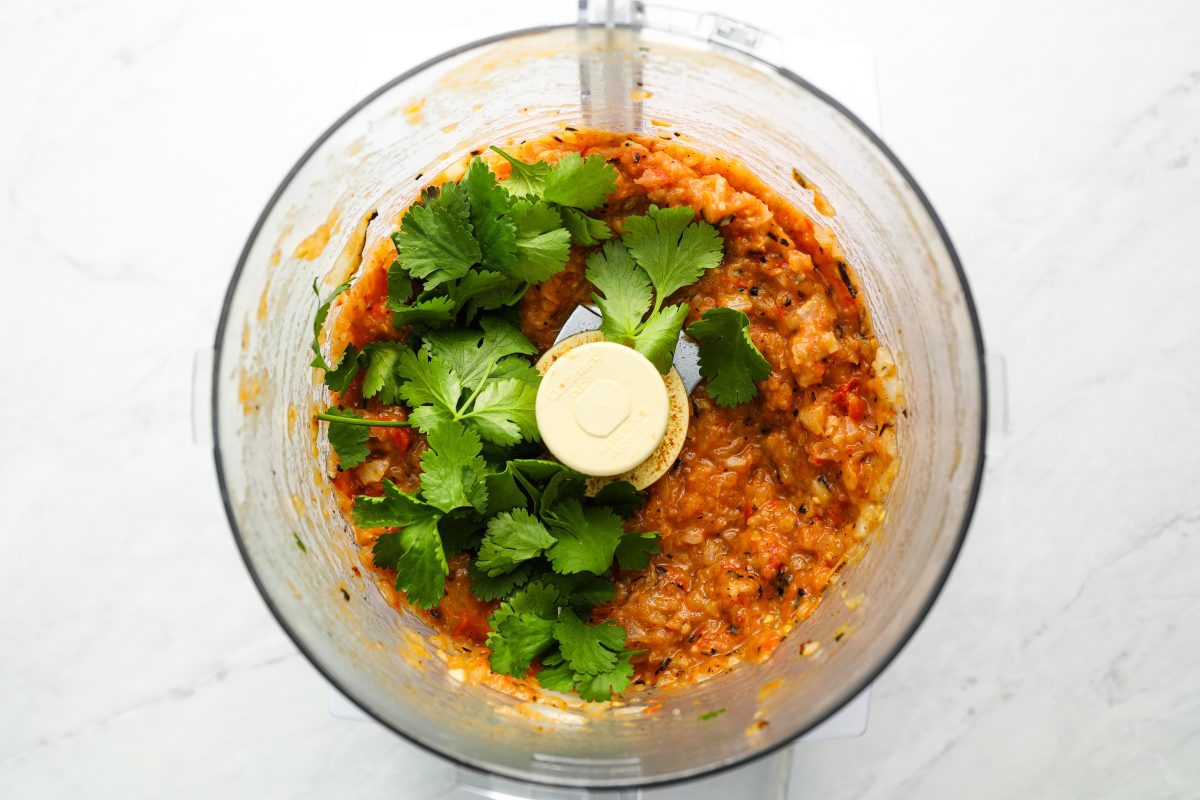
Pulse until the cilantro is chopped. Set the sauce aside.
Step 3: Make the Beef Filling
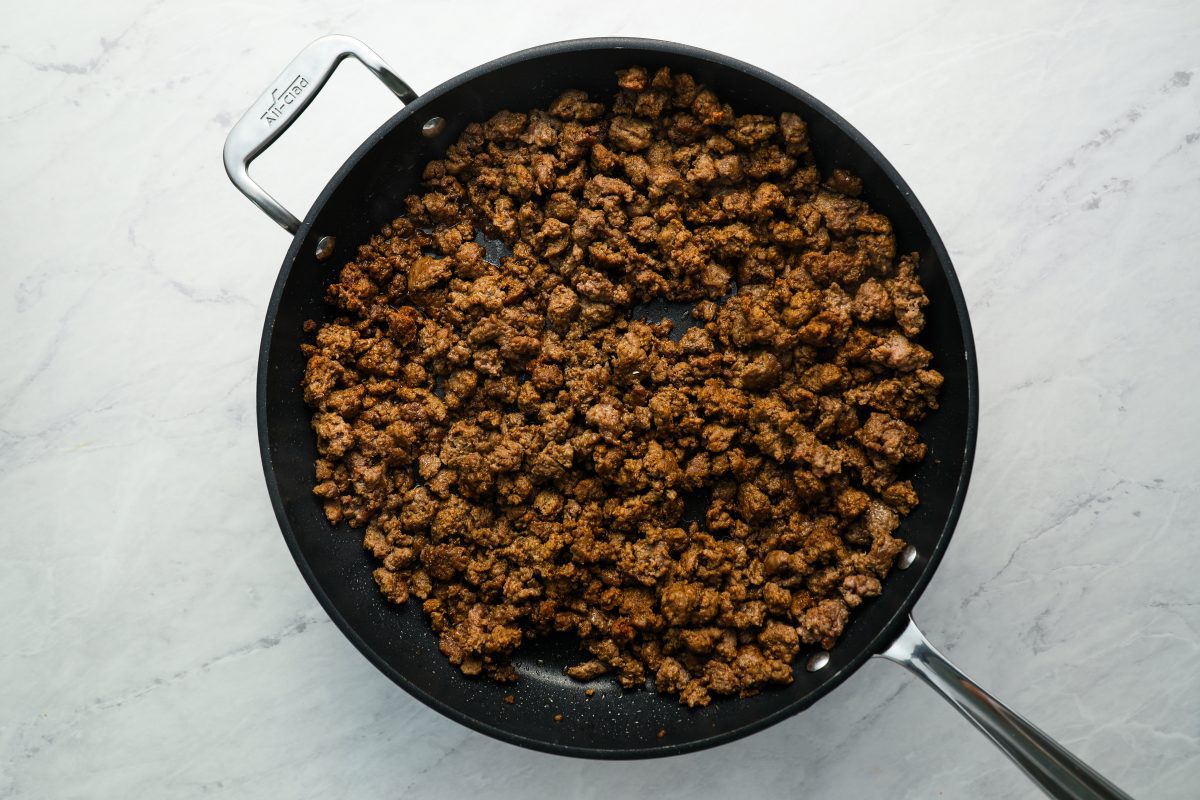
Heat the oil in a large skillet over high heat. Add the beef and cook, stirring frequently and breaking into pieces, until just slightly pink, about 2 minutes.
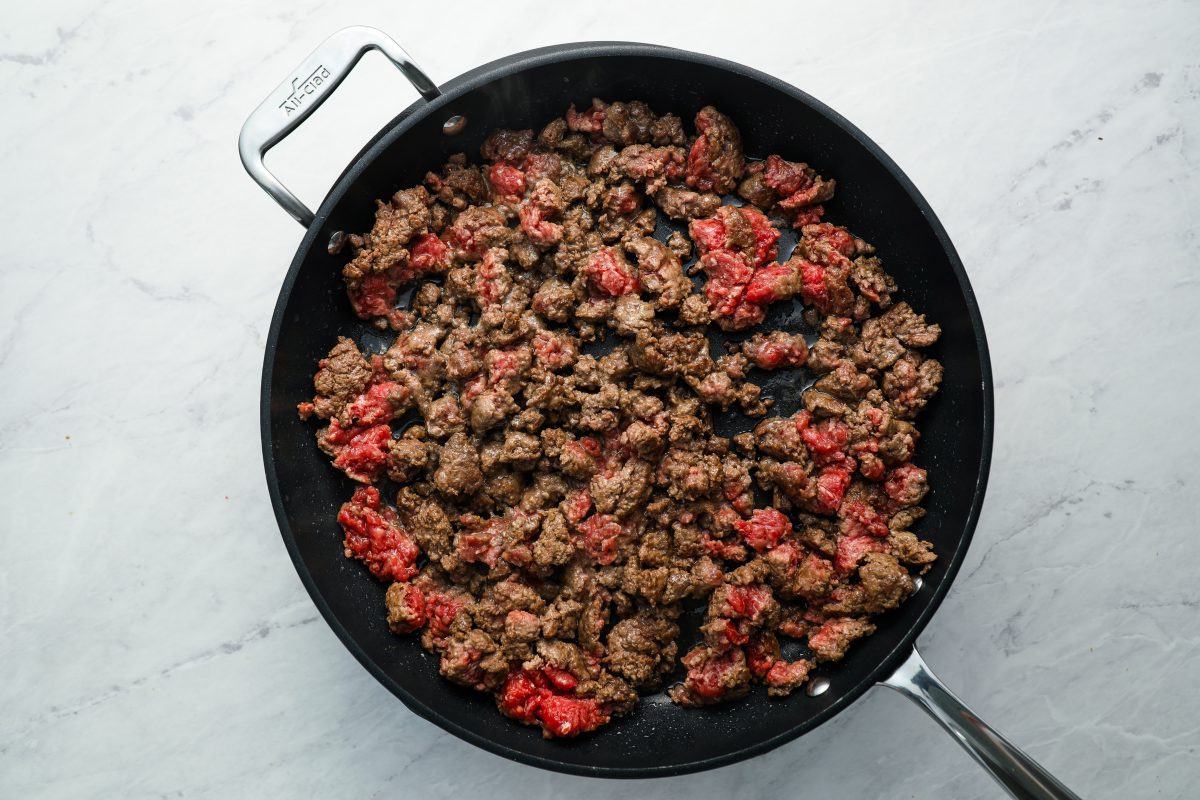
Add the chili powder, cumin, and salt. Cook, stirring occasionally, for 4 to 5 minutes more, or until cooked through.
Step 4: Assemble the Casserole
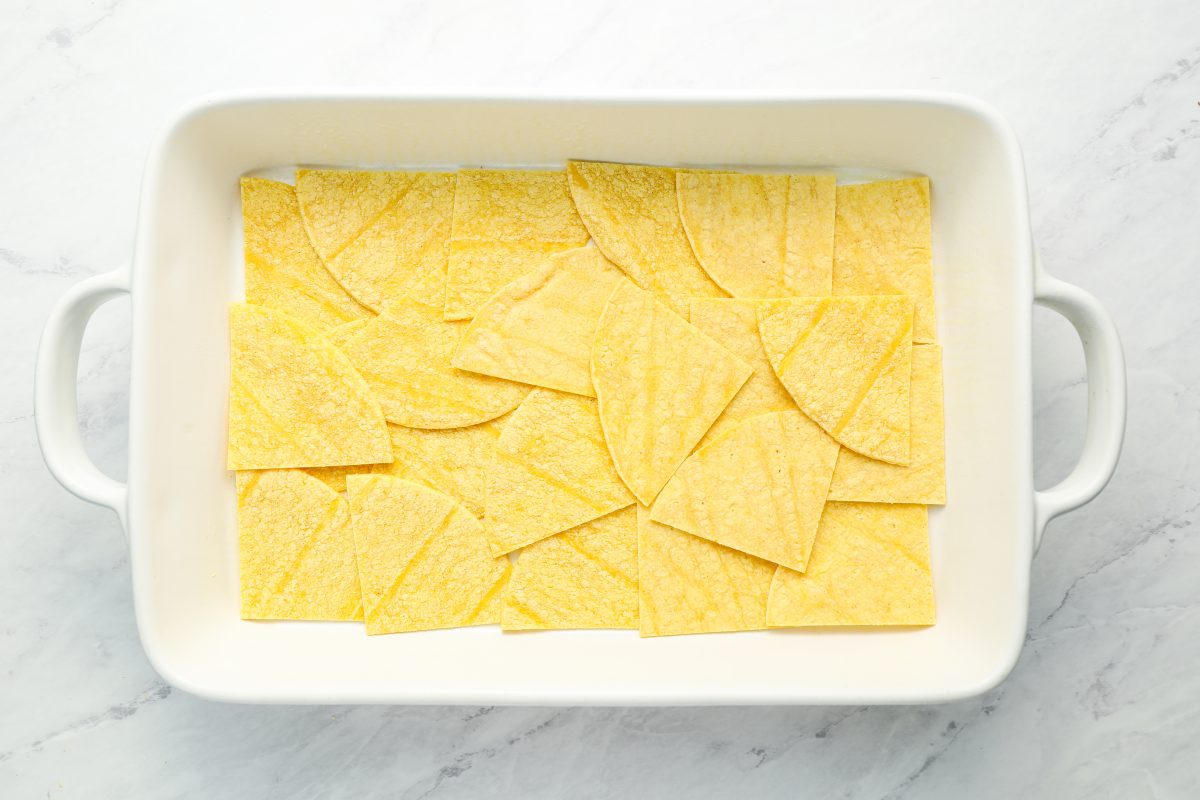
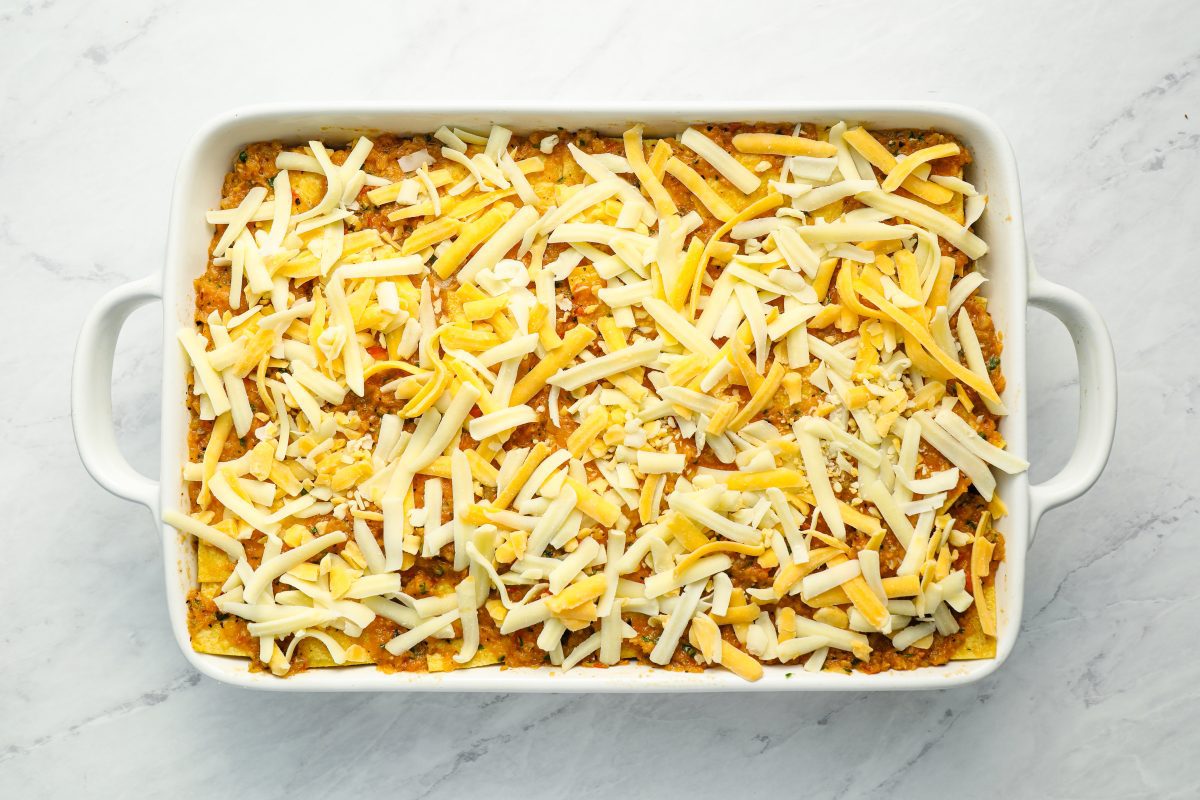
Preheat oven to 350°F and move the oven rack to the center position. Lightly oil a 9×13-inch glass or ceramic baking dish. Set aside 1 cup of the sauce for the top of the casserole. (You want to ensure that you have enough to cover the top layer of tortillas, otherwise they won’t cook through.) Line the bottom of the prepared baking dish with a layer of tortillas, overlapping them slightly.
Spoon half of the beef (and any juices) over the tortillas, followed by half of the sauce.
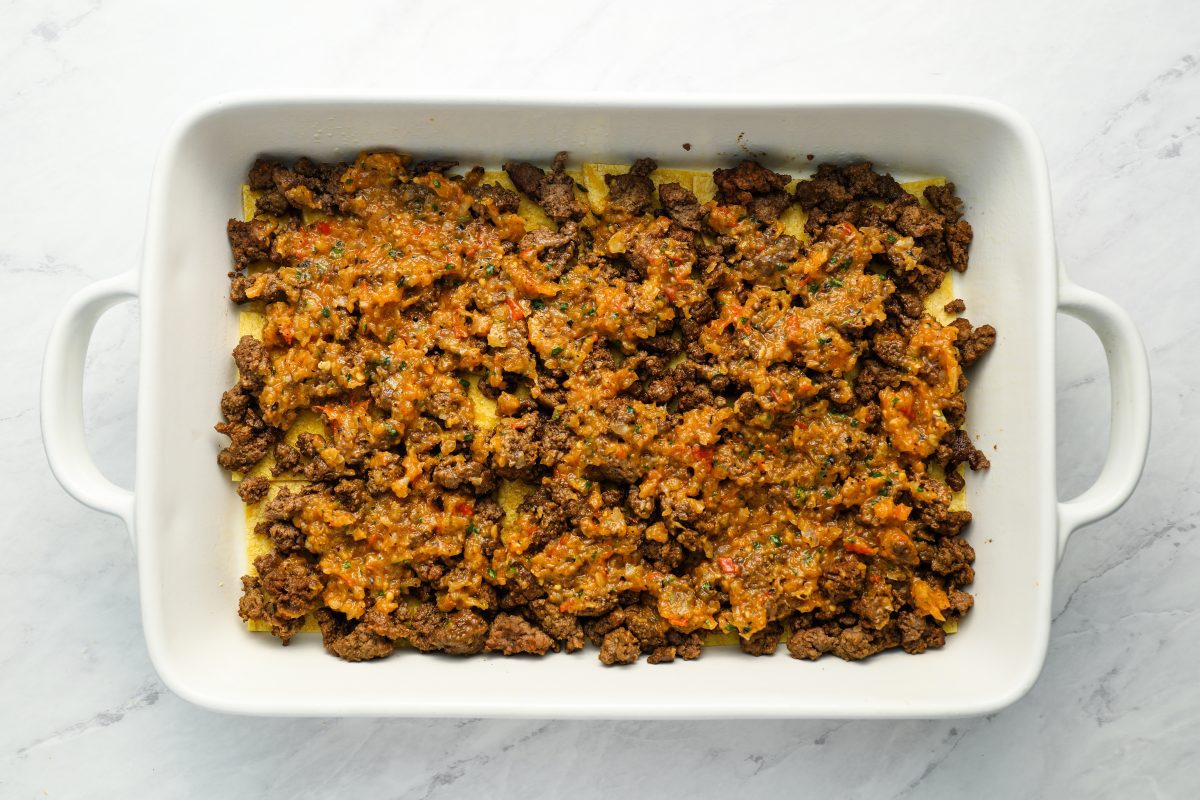
Sprinkle 1/3 of the cheese over the sauce.
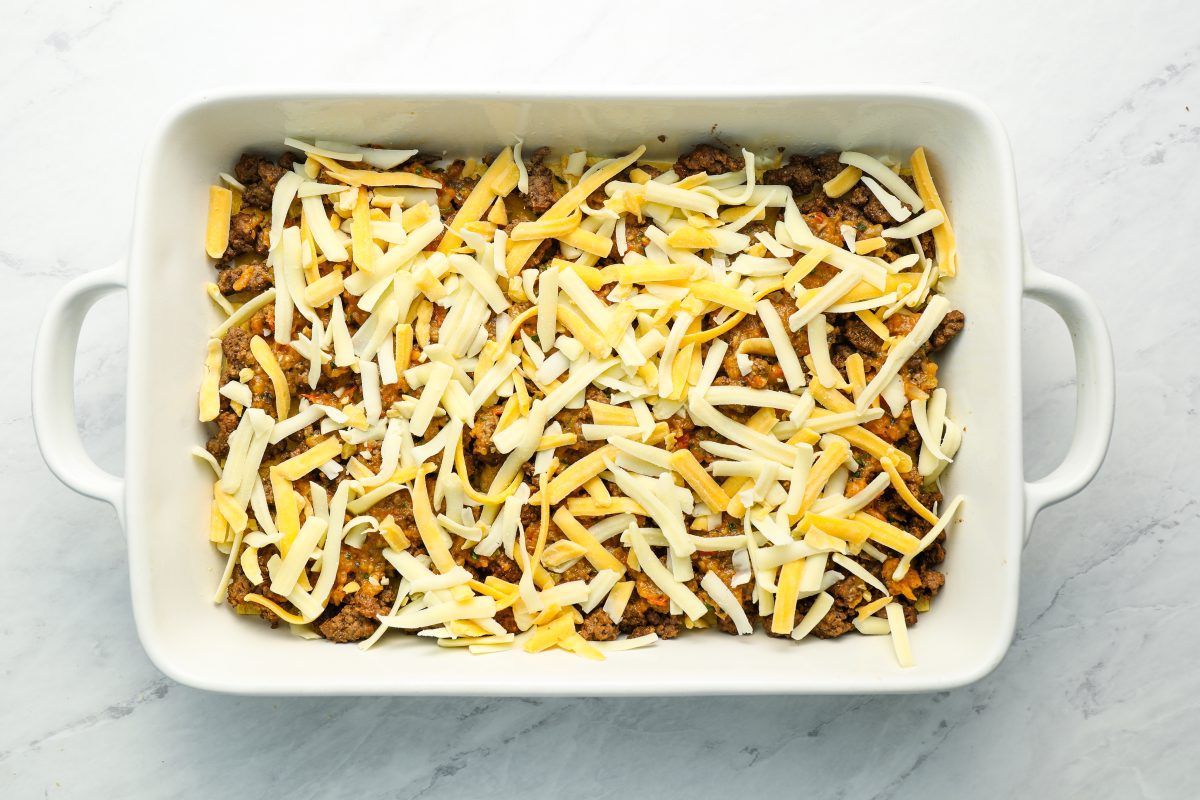
Repeat with another layer of tortillas, the remaining beef, remaining sauce, and 1/3 of the cheese. Top with the remaining tortillas. Spread the reserved cup of sauce over the tortillas and cover completely. Sprinkle the remaining cheese evenly over top.
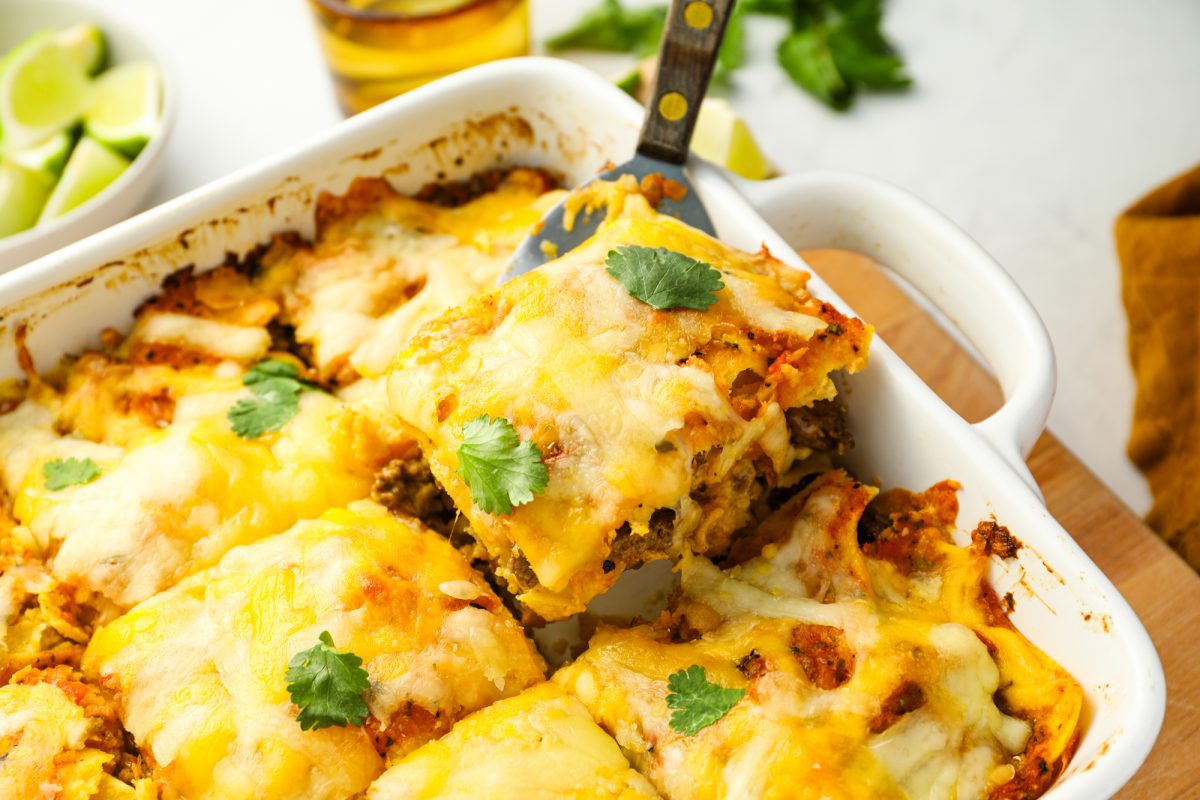
Bake, uncovered, for 30 to 35 minutes, or until the casserole is heated through and the cheese is completely melted.
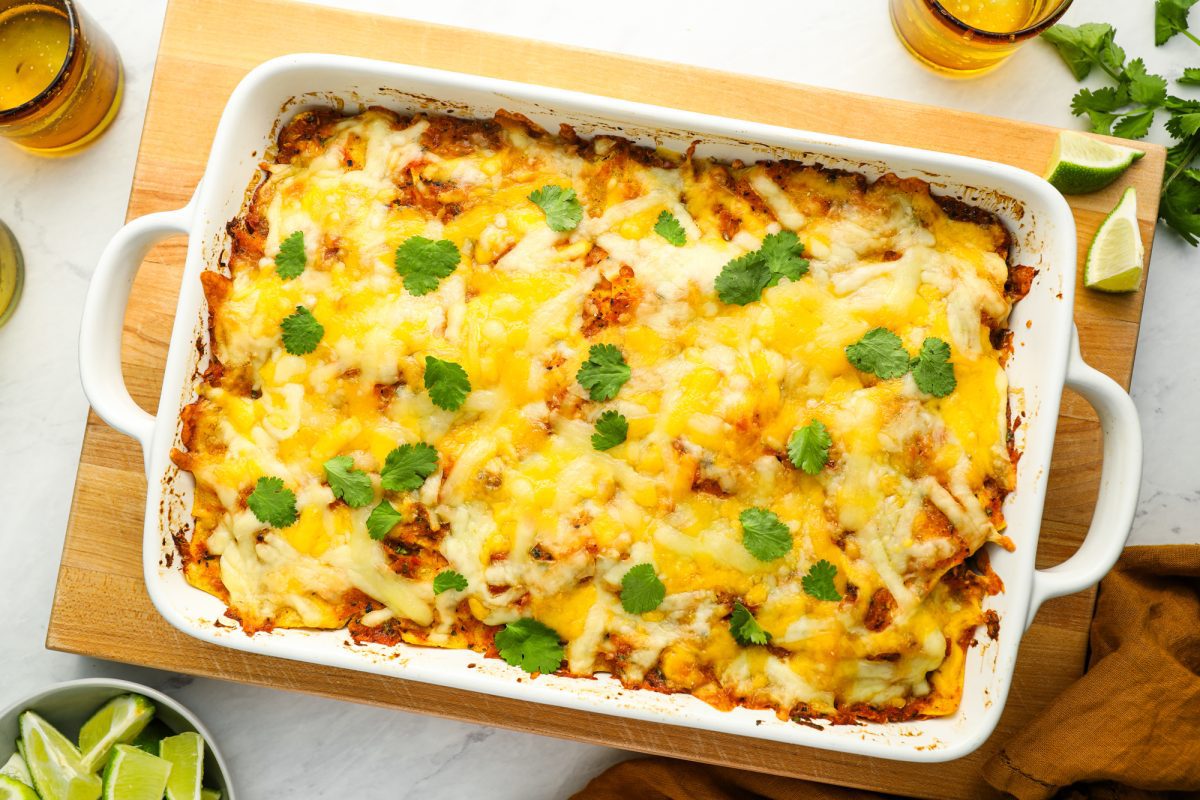
Slice the stacked enchiladas into squares and serve.
Video Tutorial
You May Also Like


Stacked Beef Enchiladas (AKA Mexican Lasagna)
With layers of corn tortillas, spicy ground beef, salsa and cheese, this stacked beef enchilada casserole is a huge family-pleaser.
Ingredients
For the Beef
- 1½ pounds 90% lean ground beef
- ½ teaspoon baking soda
- 2 tablespoons vegetable oil
- 1½ teaspoons ground chipotle chile pepper (see note)
- 2½ teaspoons ground cumin
- ¾ teaspoon salt
For the Sauce
- 4 large vine-ripened tomatoes (about 1.3 lb), quartered
- 2 medium yellow onions, cut into ½-inch wedges
- ¼ cup vegetable oil
- 6 cloves garlic, peeled
- 2 teaspoons salt
- 1 teaspoon ground cumin
- ⅛ teaspoon cayenne pepper
- ¼ cup cilantro leaves
For Assembling
- 10 (8-in) yellow corn tortillas, cut into quarters (I use Mission brand)
- 4 cups (12 oz) shredded Mexican blend cheese
Instructions
- In a large bowl, combine the ground beef and the baking soda. Mix with your hands until evenly combined. Let sit on the counter for 20 to 30 minutes.
- While the beef sits, prepare the sauce. Set an oven rack about 5 inches beneath the heating element and preheat the broiler. Line a rimmed baking sheet with aluminum foil.
- Toss the tomatoes, onions, and garlic with the vegetable oil directly on the prepared baking sheet. Broil until softened and charred, 12 to15 minutes (if the vegetables are browning too quickly, give them a quick stir with a rubber spatula). Transfer the vegetables and juices to a food processor fitted with the metal blade. Add the salt, cumin, and cayenne pepper and pulse until just slightly chunky. Add the cilantro and pulse until the cilantro is chopped. Set the sauce aside.
- Heat the oil in a large skillet over high heat. Add the beef and cook, stirring frequently and breaking into pieces, until just slightly pink, about 2 minutes. Add the chili powder, cumin, and salt and cook, stirring occasionally, for 4 to 5 minutes more, or until cooked through.
- To assemble: Preheat oven to 350°F and move the oven rack to the center position. Lightly oil a 9x13-in glass or ceramic baking dish.
- Set aside 1 cup of the sauce for the top of the casserole. (You want to ensure that you have enough to cover the top layer of tortillas, otherwise they won't cook through.)
- Line the bottom of the prepared baking dish with a layer of tortillas, overlapping them slightly. Spoon half of the beef (and any juices) over the tortillas. Top with half of the sauce and ⅓ of the cheese. Repeat with another layer of tortillas, the remaining beef, remaining sauce, and ⅓ of the cheese. Top with the remaining tortillas. Spread the reserved sauce over the tortillas and cover completely. Sprinkle the remaining cheese evenly over top. Bake, uncovered, for 30 to 35 minutes, or until the casserole is heated through and the cheese is completely melted.
- Note: Ground chipotle chile pepper is smoky and hot and makes this dish a little spicy. For a milder dish, replace the ground chipotle chile pepper with ground ancho chili pepper, which isn't as hot.
- MAKE-AHEAD/FREEZER-FRIENDLY INSTRUCTIONS: The casserole can be prepared ahead of time, tightly covered with foil, and refrigerated for up to two days or frozen for up to 3 months before baking (if frozen, defrost in the refrigerator before cooking). It can also be fully baked, tightly covered with foil, and refrigerated for up to two days or frozen for up to 3 months. To reheat: defrost if necessary and heat the covered casserole in a 350°F oven for about 30 minutes, or until hot. If you'd rather reheat individual servings, small portions can be zapped in the microwave for 1 to 2 minutes.
Pair with


Nutrition Information
Powered by ![]()
- Per serving (8 servings)
- Calories: 491
- Fat: 32 g
- Saturated fat: 11 g
- Carbohydrates: 21 g
- Sugar: 4 g
- Fiber: 3 g
- Protein: 30 g
- Sodium: 608 mg
- Cholesterol: 96 mg
This website is written and produced for informational purposes only. I am not a certified nutritionist and the nutritional data on this site has not been evaluated or approved by a nutritionist or the Food and Drug Administration. Nutritional information is offered as a courtesy and should not be construed as a guarantee. The data is calculated through an online nutritional calculator, Edamam.com. Although I do my best to provide accurate nutritional information, these figures should be considered estimates only. Varying factors such as product types or brands purchased, natural fluctuations in fresh produce, and the way ingredients are processed change the effective nutritional information in any given recipe. Furthermore, different online calculators provide different results depending on their own nutrition fact sources and algorithms. To obtain the most accurate nutritional information in a given recipe, you should calculate the nutritional information with the actual ingredients used in your recipe, using your preferred nutrition calculator.
Gluten-Free Adaptable Note
To the best of my knowledge, all of the ingredients used in this recipe are gluten-free or widely available in gluten-free versions. There is hidden gluten in many foods; if you're following a gluten-free diet or cooking for someone with gluten allergies, always read the labels of your ingredients to verify that they are gluten-free.
A delicious recipe that my family loves! I made it gluten free by using white corn tortillas and dotted some sour cream around on the layers to add a bit more moisture as gluten free tortillas tend to be drier. Yummo! Thanks Jen.
Great flavors but kind of a goopy mess. I cut (spooned) it up into individual leftover portions and maybe it will be better as leftovers. Question: If I rolled the meat filling up in the corn tortillas and covered the enchiladas with the (awesome) sauce and cheese, then baked it, would I get good results? Don’t get me wrong, I love your recipes, and this is the first one that was, well, underwhelming.
Hi Pam, I’m sorry you found this to be less than great! Yes, I think your idea of wrapping up the filling and baking it would work. I’d love to hear how it turns out if you try it!
Delicious! I prepped the sauce and meat over the weekend and put it together after work for dinner that night. Flavor is delicious – can taste the caramelized veggies from the sauce. Next time I may try a vegetarian version with beans or roasted peppers and squash. I love that I can prep it before hand and bake it a few days later – a must for a working mom.
This was so good and a huge hit with my family! Didn’t change a thing because you don’t need to with Jenn’s recipes! Jenn, I am a huge fan. You are my go-to for everything and I love your cookbook as well. I pre-ordered it months ago and was so happy to get it yesterday. I can’t wait to dig in. Thanks for all you do!
So glad you enjoyed it (and thanks for your support with the cookbook)! ❤️
So yummy! I made with ground elk as we don’t eat beef, and cut back the salt a little. Made the recipe exactly (except above note) and it was a hit! Next time I make it I will make a little more sauce, 1/2 recipe more or so. Thanks much Jen, for another great dinner.
Made this today. Unfortunately I didn’t love it. It was on the dry side and something about the flavors was off. Not sure if it was the sauce or the meat but we didn’t like it. 😕
Made these for my cousin on the way to meet her new baby! I have to say, I thought the sauce fell into the category of “Aint nobody got time for that”….but I followed the steps anyway. And then I tasted it……..(insert Homer Simpson Drool). Now I understand. I will be making this again next week for a trip to the mountains. That sauce is EVERYTHING, and it makes the entire dish REALLY tasty. I will be doubling the recipe for sure! Thank you for another reliable, tasty hit!
A flavorful recipe and very easy to put together. My son was in town on business; I wanted to make something that could be prepared ahead of time and refrigerated. He loved the spicy flavors and I loved the simplicity! Thanks Jenn. This is a keeper!
Hi Jenn, I want to make a veg enchilada instead of beef.Can you please provide an alternate recipe for that? Thanks!
I’ll add that to my list for sure – meanwhile, you could definitely replace the beef with black beans and sautéed veggies (peppers, squash, etc.).
I made this last night- I loved it! You are my go to when I want to try something new. I have made my own red sauce/enchilada sauce for Mexican- food but I have a hard time reproducing (consistency). I am always looking for some other sauce. My original sauce required heating, soaking blending/pureeing whole dried peppers- it is good, but I don’t know enough about individual ingredients to be consistent. I realize this is not the same type of sauce, but I really like the idea of a sauce made with tomatoes and onions roasted (with the seasonings). Healthy and easy. I am one of those picky eaters who doesn’t like tomatoes, but I like tomato sauce. I just made sure I pureed it smooth. It had great flavors. I read other reviews- it is just 2 of us, so I split the ingredients to a “use” portion and a freeze portion. I didn’t change anything else. I am excited to get to eat this again next week or the week after!