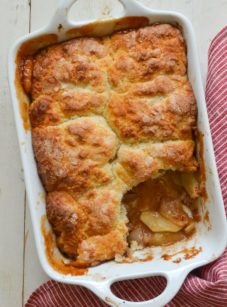
Perfect Apple Pie


This post may contain affiliate links. Read my full disclosure policy.
Ready to bake the best apple pie ever? This step-by-step guide will help you create the ultimate pie with a buttery, flaky crust and a gooey, cider-flavored filling—an irresistible fall favorite!

As fall rolls in and apple season reaches its peak, there’s no better time to bake a homemade apple pie—whether you want to use up all those apples or whip up a special Thanksgiving dessert. It may seem daunting—after all, all homemade fruit pies are a bit of a project—but with a tried-and-true recipe like this one, you’ll achieve the perfect pie every time, and it’s absolutely worth the effort!
The secret to making a perfect apple pie lies in starting with a foolproof all-butter pie crust and avoiding common pitfalls—like a soupy filling and a soggy crust—by cooking the apples before filling and baking the pie. This extra step thickens the juices, concentrates their flavor, and ensures a crisp, flaky crust with a rich, cider-flavored apple pie filling. This, my friends, is the ultimate pie! Serve it with a scoop of vanilla ice cream, a dollop of whipped cream, or a drizzle of caramel sauce for an extra-special dessert.
“This pie turned out incredible! the crust is delicious and the filling juicy and full of flavor.”
What You’ll Need To Make Apple Pie

- All-Purpose Flour: Provides the essential structure and stability needed for the crust. Additionally, it thickens the filling by absorbing the juices released during baking. Always measure flour by spooning it into the measuring cup and leveling off to ensure accuracy.
- Sugar: Adds a touch of sweetness to the crust.
- Baking Powder: Helps to slightly leaven the crust.
- Butter: Creates flakiness and richness in the crust.
- Ice Cold Water: Binds the dough together. The temperature of the water helps keep the butter cold. This ensures the crust will come out flaky and tender.
- Baking Apples: For apple pie, use baking varietals such as Granny Smith apples, Honeycrisp apples, or Golden Delicious apples (or any combination); they hold their shape when cooked so you don’t end up with applesauce pie!
- Lemon Juice: Prevents the apples from browning and adds a hint of tartness.
- Dark Brown Sugar: Sweetens the filling and adds a rich, molasses-like flavor.
- Ground Cinnamon: Adds warmth and spice to the filling.
- Cornstarch: Works with the flour to thicken the filling, ensuring it isn’t runny.
- Beaten Egg/Cream/Milk: Brushed over the crust to give it a golden, glossy finish. Any of these 3 options will work nicely.
- Granulated or Turbinado Sugar: Sprinkled on top for added sweetness and a slight crunch.
- Jump to the printable recipe for precise measurements
Step-By-Step Instructions
Step 1: Prepare the Crust
Combine the flour, sugar, salt, and baking powder in the bowl of a food processor fitted with the metal blade. Pulse a few times to combine.

Add the pieces of butter and pulse until the mixture is crumbly with lots of pea-size clumps of butter within.

Add the water and pulse until the mixture is evenly moistened and very crumbly.

Dump the dough crumbles onto a work surface and divide into two piles.

Make one pile about 15% bigger than the other. You can eyeball it, but if you have a kitchen scale, one pile should weigh 13 oz (368 g) and the other 11.5 oz (326 g).

Shape into two balls of dough and pat each one into a 5-inch (13-cm) disc. Wrap the discs in plastic wrap and refrigerate for at least 45 minutes or up to 3 days to rest.

Step 2: Prepare the Apple Pie Filling
In a large heavy-bottomed pot or Dutch oven, mix the apples with lemon juice, brown sugar, salt, cinnamon, flour, and cornstarch. Stir until thoroughly combined and both the flour and cornstarch are dissolved.

Place the pot over medium heat and cook, stirring often, until the apples soften and the juices thicken, 11 to 13 minutes.

Transfer the apples and their juices to a baking sheet, spreading them out evenly. Allow them to cool completely.

Preheat the oven to 425°F (220°C) and set an oven rack in the lower third position. Place a baking sheet on this rack to preheat as well. (This acts like a pizza stone, providing a hot surface to help the bottom crust of the pie crisp up effectively.)
Step 3: Prepare the Bottom Crust
Remove the larger disc of dough from the refrigerator. Lightly dust a clean work surface with flour and place the dough on it; sprinkle a bit of flour over the dough as well. Gently knead the dough with your hands just until it becomes soft and malleable (avoid overworking it—you want it just supple enough to roll out). Roll the dough out into a 13-inch (33-cm) circle, adding more flour as needed to prevent sticking.

Carefully lift the dough by draping it over your rolling pin and transfer it to a 9-inch by 1½ -inch (23-cm by 3.75-cm)-deep pie pan, preferably metal (as metal conducts heat more effectively, helping the bottom crust crisp up) but a ceramic or glass pie dish will work too.

Gently press the dough into the pan, making sure to ease it into place without stretching. Trim the edges of the dough to extend about ½ inch (1.25 cm) beyond the pie pan’s lip.

Transfer the cooled apples and their juices into the crust; refrigerate while you prepare the top crust.

Step 4: Prepare the Top Crust
Remove the second disc of dough from the refrigerator and roll it out into an 11-inch (28-cm) circle, following the same process described above. Retrieve the filled pie from the refrigerator and carefully drape the rolled dough over the top.

Crimp the edges with a fork or flute them with your fingers to seal the top and bottom crusts together. Work quickly and dust your fingers with flour as needed to prevent the dough from becoming too warm.

Brush the top crust with egg wash, cream, or milk.

Sprinkle with 2 tablespoons of granulated or turbinado sugar.

Cut four 3-inch (7½-cm) slits in the top crust to allow steam to escape.
Place the pie on the preheated baking sheet and bake at 425°F (220°C) for 15 minutes. Then reduce the oven temperature to 375°F (190°C) and continue baking for an additional 45 minutes, or until the crust is golden brown.

Let the pie cool completely on a wire rack before slicing, at least 4 hours. Resist the temptation to cut into the pie while it’s warm, or you may end up with apple soup!

Video Tutorial
Frequently Asked Questions
Anytime you’re baking with apples whether it’s apple strudel or applesauce, it’s a good idea to use a blend of tart and sweet baking apples for the best flavor. Granny Smith, Honey Crisp, Gala, Jonagold, Jonathan, and Golden Delicious are all good options—try different varietals and see what combinations you like best.
Sure! The pie can be baked up to 1 day ahead of time and stored, loosely covered with foil, at room temperature. If you’d like to reheat it, place the pie on a baking sheet and loosely cover it with foil to protect the crust. Reheat it at 350°F for 15 to 20 minutes, or until it’s warmed through. Just keep in mind that the filling may get a bit soupy when served warm.
Definitely, apple pie can be frozen for up to 3 months before or after baking it. (If freezing it unbaked, hold off on brushing the top crust with the beaten egg and sprinkling it with sugar; you can do that right before baking.) If baked, let it cool completely and place it in the freezer uncovered. When fully frozen, wrap the pie securely in foil and freeze. If the pie is unbaked, wrap it securely in foil and freeze. When ready to serve, proceed with baking instructions above (the pie is likely to take 10 to 15 minutes longer to bake).

You May Also Like


Perfect Apple Pie
Ingredients
For the Crust
- 2¾ cups all-purpose flour, spooned into measuring cup and leveled-off
- 3 tablespoons granulated sugar
- 1 teaspoon salt
- ¼ teaspoon baking powder
- 18 tablespoons (2 sticks + 2 tablespoons) cold unsalted butter, sliced into 1-inch pieces
- 7 tablespoons ice cold water
For the Filling
- 4½ pounds baking apples (about 8 large apples; see note), peeled, cored, and sliced ¼-inch thick
- 1 tablespoon fresh lemon juice, from 1 lemon
- 1 cup (packed) dark brown sugar
- Heaping ¼ teaspoon salt
- Heaping ¼ teaspoon ground cinnamon
- 2 tablespoons all-purpose flour
- 2 tablespoons cornstarch
For Baking
- A beaten egg, heavy cream, or milk, for brushing over crust
- 2 tablespoons granulated or turbinado sugar, for topping the pie
Instructions
Prepare the Crust
- Combine the flour, sugar, salt, and baking powder in the bowl of a food processor fitted with the metal blade. Pulse a few times to combine. Add the pieces of butter and pulse until the mixture is crumbly with lots of pea-size clumps of butter within.
- Add the water and pulse until the mixture is evenly moistened and very crumbly.
- Dump the dough crumbles onto a work surface and divide into two piles, with one pile about 15% bigger than the other. You can eyeball it, but if you have a kitchen scale, one pile should weigh 13 oz (368 g) and the other 11.5 oz (326 g). Shape into two balls of dough and pat each one into a 5-inch (13-cm) disc. Wrap the discs in plastic wrap and refrigerate for at least 45 minutes or up to 3 days to rest.
Cook the Apples
- In a large heavy-bottomed pot or Dutch oven, mix the apples with lemon juice, brown sugar, salt, cinnamon, flour, and cornstarch. Stir until thoroughly combined and both the flour and cornstarch are dissolved. Place the pot over medium heat and cook, stirring often, until the apples soften and the juices thicken, 11 to 13 minutes. Transfer the apples and their juices to a baking sheet, spreading them out evenly. Allow them to cool completely.
Preheat the Oven
- Preheat the oven to 425°F (220°C) and set an oven rack in the lower third position. Place a baking sheet on this rack to preheat as well. (This acts like a pizza stone, providing a hot surface to help the bottom crust of the pie crisp up effectively.)
Assemble & Bake The Pie
- Remove the larger disc of dough from the refrigerator. Lightly dust a clean work surface with flour and place the dough on it; sprinkle a bit of flour over the dough as well. Gently knead the dough with your hands just until it becomes soft and malleable (avoid overworking it—you want it just supple enough to roll out). Roll the dough out into a 13-inch (33-cm) circle, adding more flour as needed to prevent sticking. Carefully lift the dough by draping it over your rolling pin and transfer it to a 9-inch by 1½-inch (23-cm by 3.75-cm) deep pie pan, preferably metal (as metal conducts heat more effectively, helping the bottom crust crisp up) but ceramic or glass will work too. Gently press the dough into the pan, making sure to ease it into place without stretching. Trim the edges of the dough to extend about ½ inch (1.25 cm) beyond the pie pan's lip.
- Transfer the cooled apples and their juices into the crust; refrigerate while you prepare the top crust.
- Remove the second disc of dough from the refrigerator and roll it out into an 11-inch (28-cm) circle, following the same process described above. Retrieve the filled pie from the refrigerator and carefully drape the rolled dough over the top. Crimp the edges with a fork or flute them with your fingers to seal the top and bottom crusts together. Work quickly and dust your fingers with flour as needed to prevent the dough from becoming too warm. Brush the top crust with beaten egg, cream, or milk, and evenly sprinkle with 2 tablespoons of granulated or turbinado sugar. Cut four 3-inch (7.5-cm) slits in the top crust to allow steam to escape.
- Place the pie on the preheated baking sheet and bake at 425°F (220°C) for 15 minutes. Then reduce the oven temperature to 375°F (190°C) and continue baking for an additional 45 minutes, or until the crust is golden brown. Let the pie cool completely on a wire rack before slicing, at least 4 hours. Resist the temptation to cut into the pie while it’s warm, or you may end up with apple soup!
Notes
Nutrition Information
This website is written and produced for informational purposes only. I am not a certified nutritionist and the nutritional data on this site has not been evaluated or approved by a nutritionist or the Food and Drug Administration. Nutritional information is offered as a courtesy and should not be construed as a guarantee. The data is calculated through an online nutritional calculator, Edamam.com. Although I do my best to provide accurate nutritional information, these figures should be considered estimates only. Varying factors such as product types or brands purchased, natural fluctuations in fresh produce, and the way ingredients are processed change the effective nutritional information in any given recipe. Furthermore, different online calculators provide different results depending on their own nutrition fact sources and algorithms. To obtain the most accurate nutritional information in a given recipe, you should calculate the nutritional information with the actual ingredients used in your recipe, using your preferred nutrition calculator.
The pie is in the oven as I write this, and the entire house smells like Thanksgiving. In response to an earlier post, I had read through the entire recipe at least three times and knew what I was getting into– if I had wanted an easier or quicker recipe, I would have chosen another one.
But based on all of Jenn’s other recipes I’ve tried, to great success, I decided it was worth the effort. Many steps, yes, but none of them especially difficult. I can’t wait to serve it this evening. Jenn, so many of us love your recipes, thank you, keep ’em coming, and Happy Thanksgiving!
Thanks for your kind words — hope you had a nice Thanksgiving and enjoyed the pie!
I’ve been using another apple pie recipe for a long time until I tried Jennifer’s Crisp and flavourful recipe. This is the best pie ever! I followed the instructions, it was easy to follow. My family loved it. Ever since I found your recipe on your website l started to cook your recipes. My son gave me your cookbook on Mother’s Day 😊 and l love your cook book! I enjoyed reading cooking tips and learned many things from it.Thank you for sharing your true and tried recipe that let us enjoy meals every time. You are great chef. I will definitely get your second cookbook, thank you!
❤️
oh boy, first timer here and I think I messed up the filling. I added the flour and cornstarch along with the cinnamon, sugar, etc,. to the apples. Collected the juice and microwaved. It did not reduce, but it did thicken up nicely and tastes yummy as well. I am scared to mix it all back in with the apples and complete the bake. Should I re-do the filling portion just in case? Darn, I thought I was doing such a good job. Thanks.
Hi Kari, I think it will be just fine so I would just proceed with the recipe. Hope it turns out well!
Hi Jen,
I love all of your recipes and have had great success preparing them.
Thank you for your attention to detail when explaining the instructions.
I am baking the pie for tomorrow and am wondering if it needs to be refrigerated or if it should sit on the counter overnight?
Hi Jody, So glad you like the recipes and find them easy to follow! You can let the pie sit on the counter overnight. Enjoy!
Hi there! My husband is allergic to soy and soybean oil is the first ingredient in vegetable shortening 🙁 Can I use a different substitute in the pie crust?
Sure, Krista — you can replace it with lard or more butter.
Absolutely scrumptious apple pie recipe and what great crust. I am using the pie crust recipe for assortment of pies for Thanksgiving. Not sure of all the fillings but truly easy to work with. Thank you for sharing!
I’m intrigued by the idea of blind baking the bottom crust but it seems like it would be really difficult to fit and seal the top crust over the bottom crust while it is still hot. Why not let the bottom crust cool almost completely before assembling the full pie?
Hi Scott, Good question. I wrote the recipe that way to make it less time consuming, but I’ve had enough people ask a similar question that I’ve decided to update the recipe and have people let the crust cool to room temperature. It is definitely possible to seal the top crust to the hot bottom crust, but you do need to work quickly. This removes that variable. Hope you enjoy the pie if you make it!
Is it possible to prepare and freeze the apple portion of the recipe and then defrost and proceed with the rest of the recipe when ready to prepare? Or is it best to assemble whole pie and freeze?
Sure, Emily, freezing the apple portion should be fine. 🙂
If I prebake the pie, what are the instructions for when I want to serve it? Do I thaw it out and warm it up or put it frozen in the oven until hot? If so, temperature and time would be appreciated.
Hi Sona, I would thaw the pie in the fridge. Once thawed you can let it sit at room temperature. And don’t recommend serving apple pie too warm, as it tends to get soupy when hot. But you could pop it in a 300°F oven for 15-20 minutes to warm it up just a bit.
Love apple pie I use Granny Smith always leave juices in and add one Large Mackintosh cubed it melts and thickens the juice plus a little sweetness to offset the semi bitter Granies my MOM taught me they in the 1950s. ” Good Appetite “