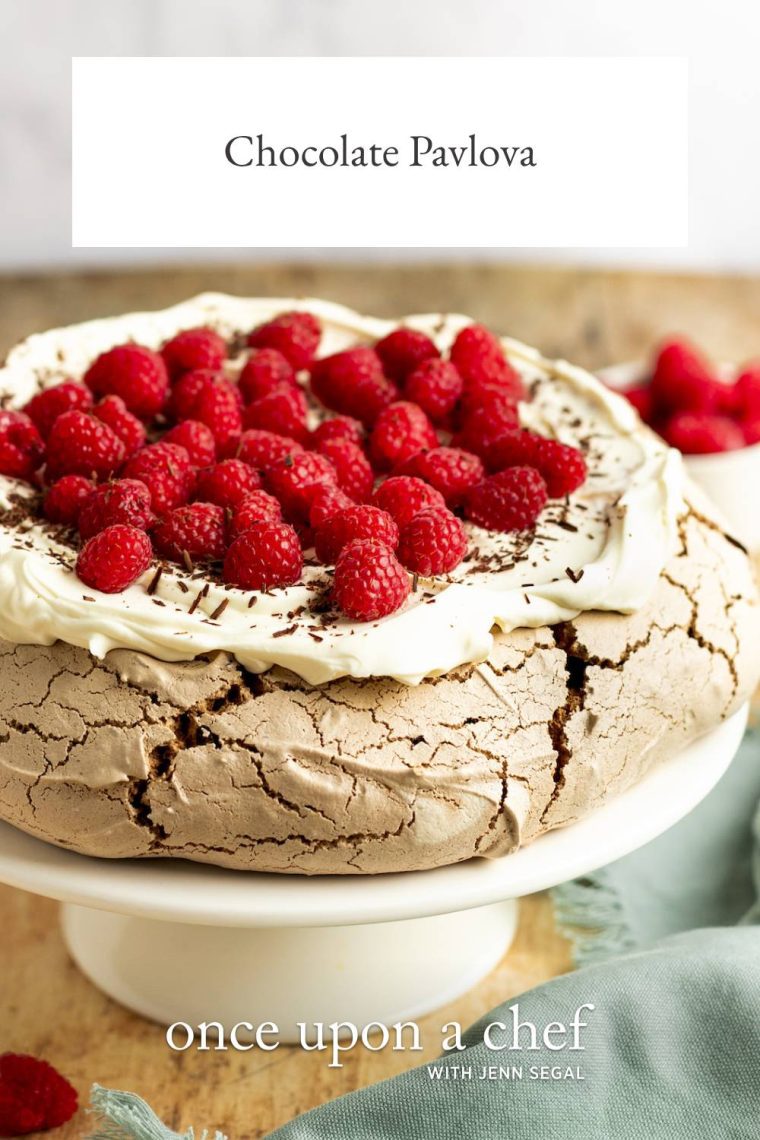
Chocolate Pavlova with Mascarpone Cream & Raspberries

This post may contain affiliate links. Read my full disclosure policy.
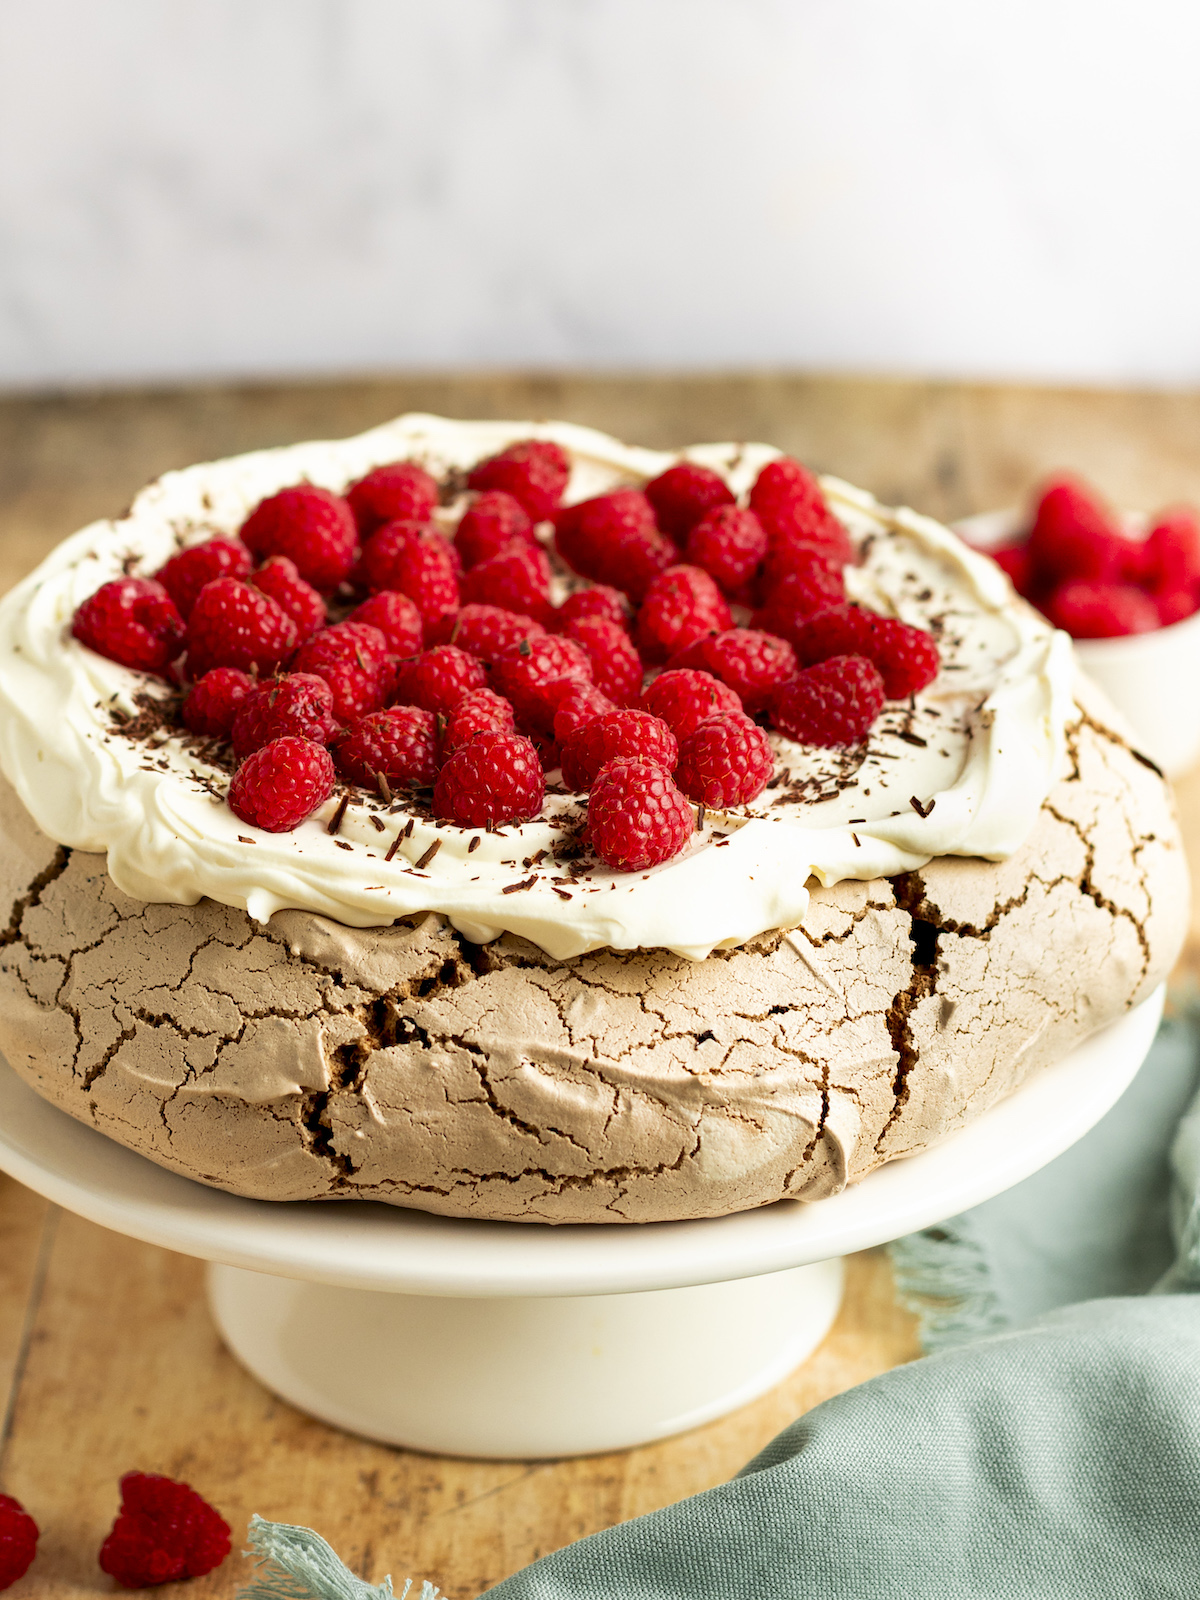
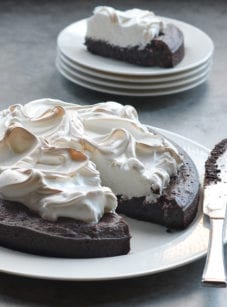
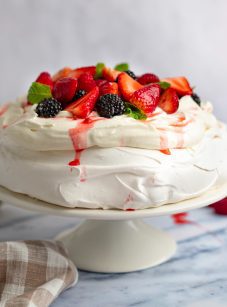
A dream of a dessert, this chocolate pavlova features a fudgy, marshmallowy center encased in a crisp shell, all topped with rich whipped cream and fresh raspberries.
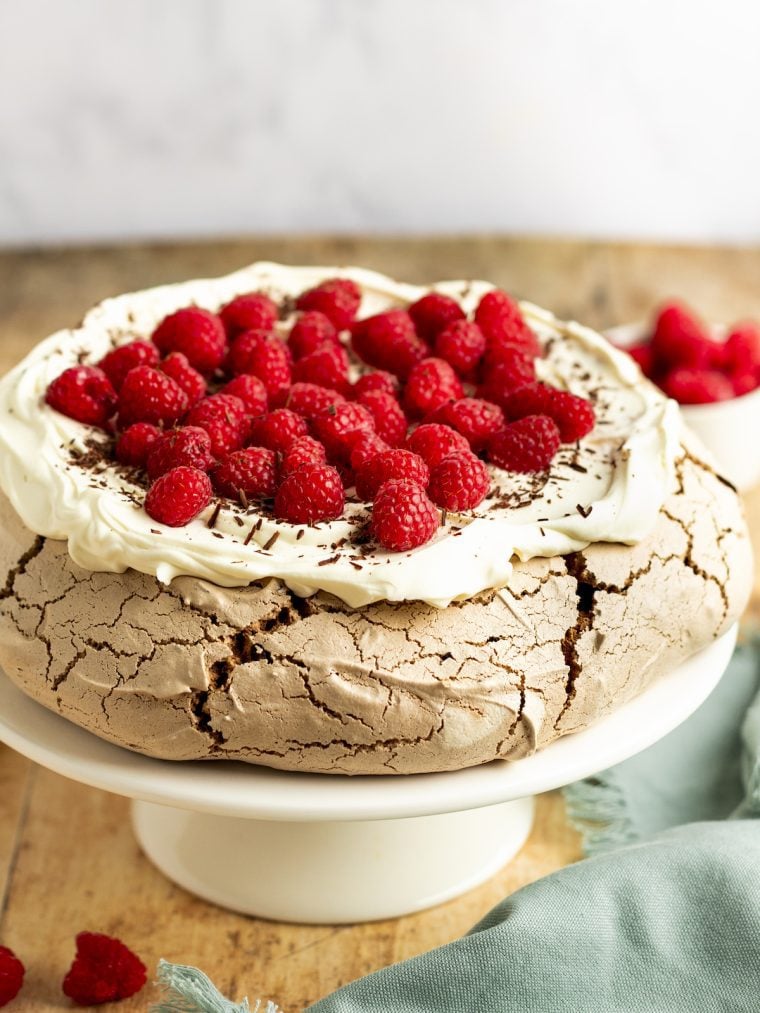
The pavlova, named after the renowned ballet dancer Anna Pavlova during her 1920s tour of Australia and New Zealand, is pure dessert magic. It features a meringue that’s crisp on the outside with a marshmallow-soft inside, usually topped with whipped cream and fresh fruit. This rich chocolate pavlova, inspired by Nigella Lawson, mixes cocoa powder and bittersweet chocolate into the meringue for a decadently fudgy base. To make it even more luxurious, I whip a little mascarpone into the cream. It’s perfect for Passover, or anytime you need a light, gluten-free dessert that’s sure to impress. I can’t wait for you to try it!
“People go WILD over this pavlova, and honestly it’s easier to make than most desserts. It truly is a showstopper. I’d give it 10 stars if I could.”
What You’ll Need To Make Chocolate Pavlova

Step-by-Step Instructions
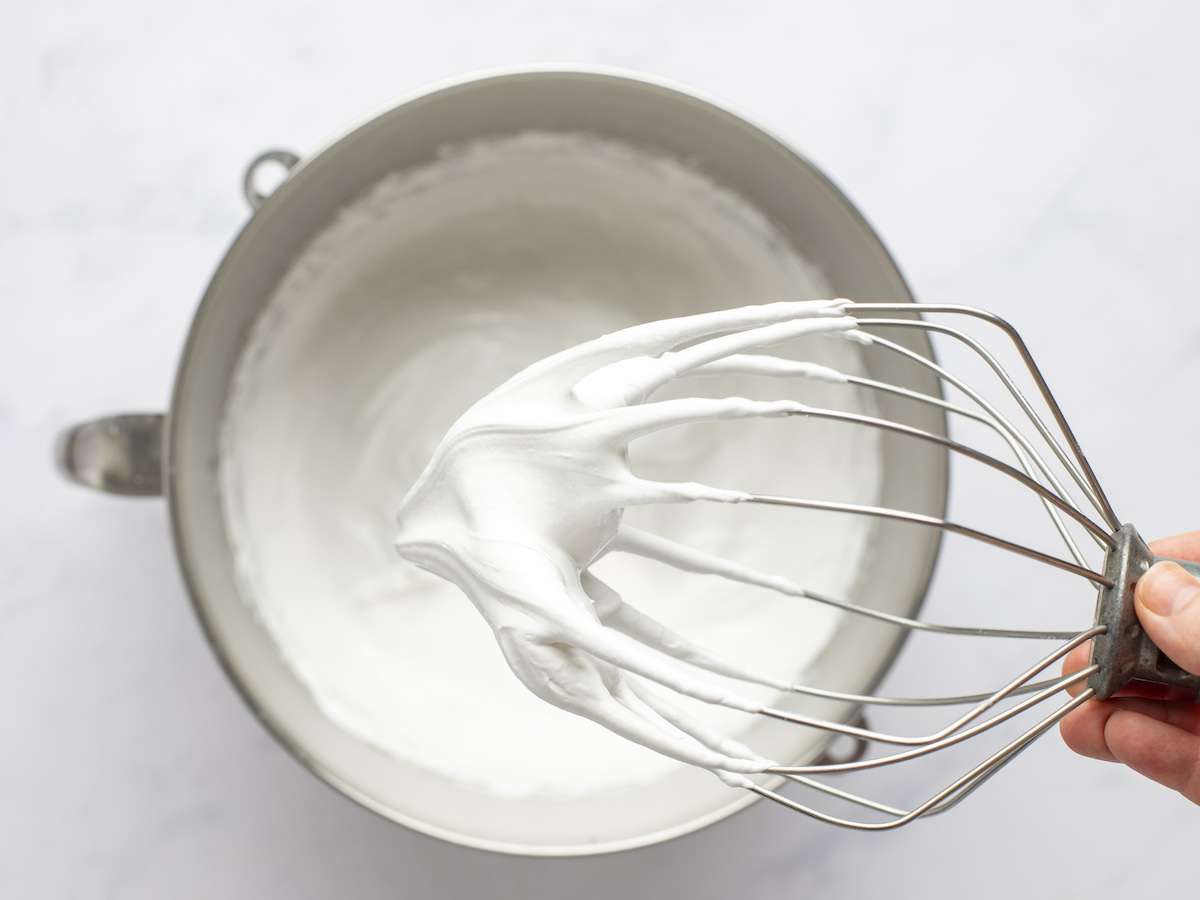
The nice thing about pavlovas is that even though they look fancy, they are incredibly easy to make. To begin, add the egg whites to the bowl an electric mixer.
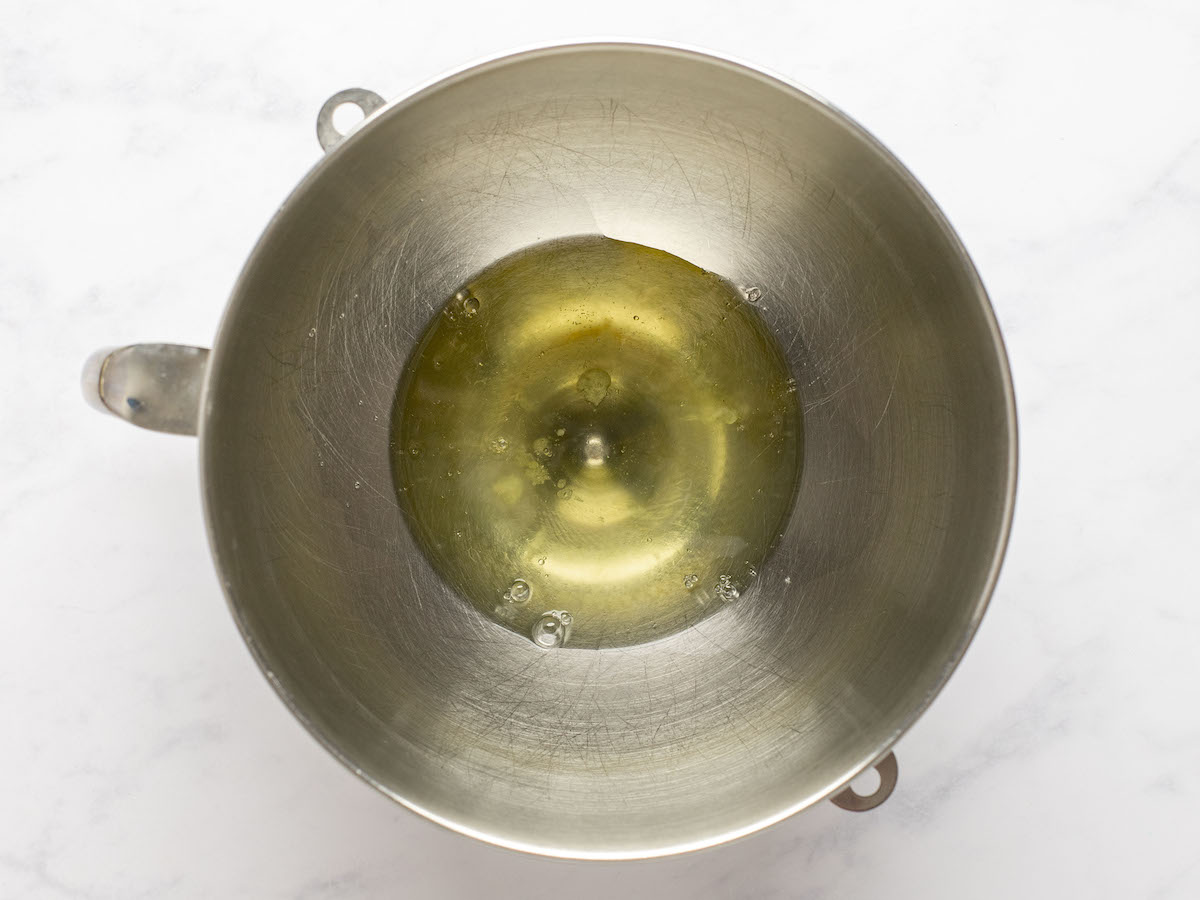
Beat until foamy and then gradually add the sugar.
Continue beating until the meringue is glossy and stiff (when you slowly lift the whisk out of the mixture, it will hold stiff peaks). Be patient; this takes 8 to 9 minutes.
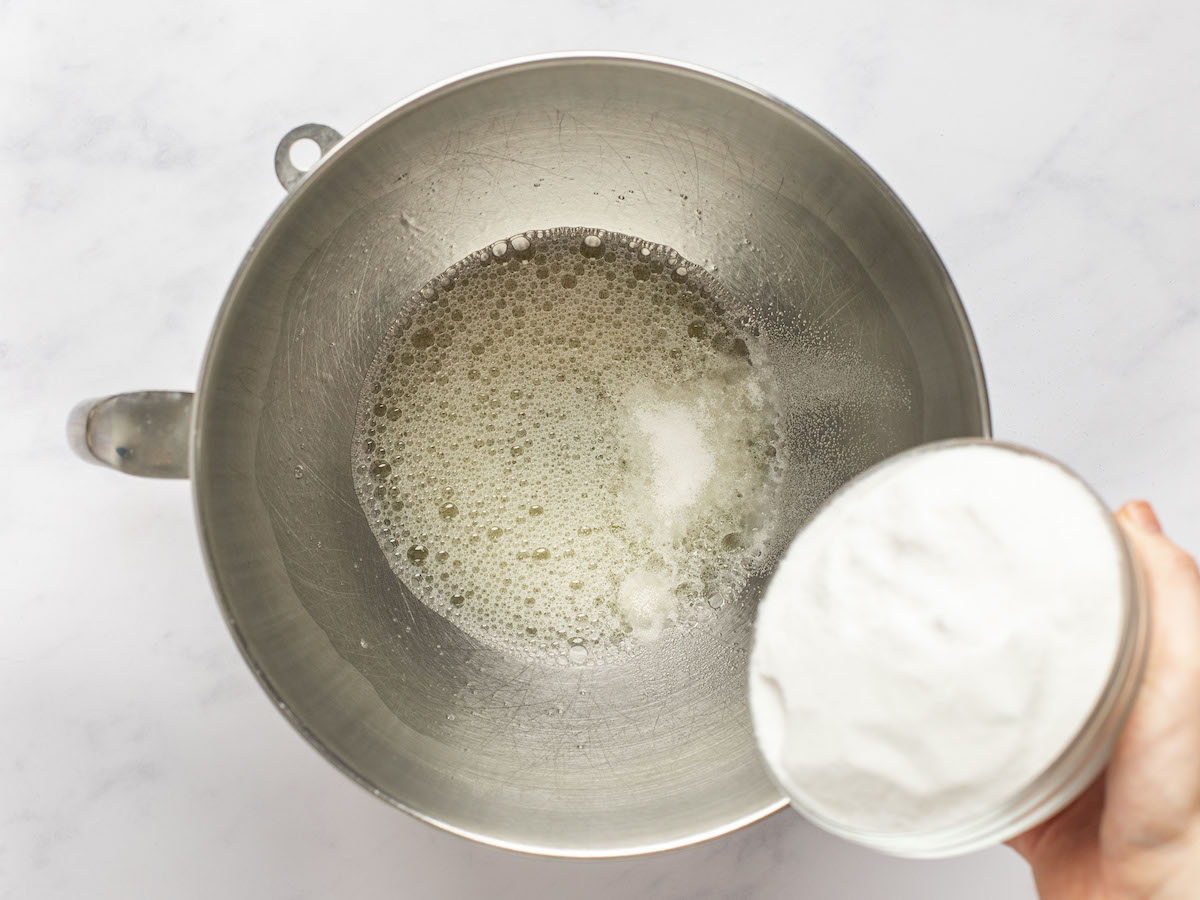
Next, sift in the cocoa powder and add the chopped chocolate and vinegar.
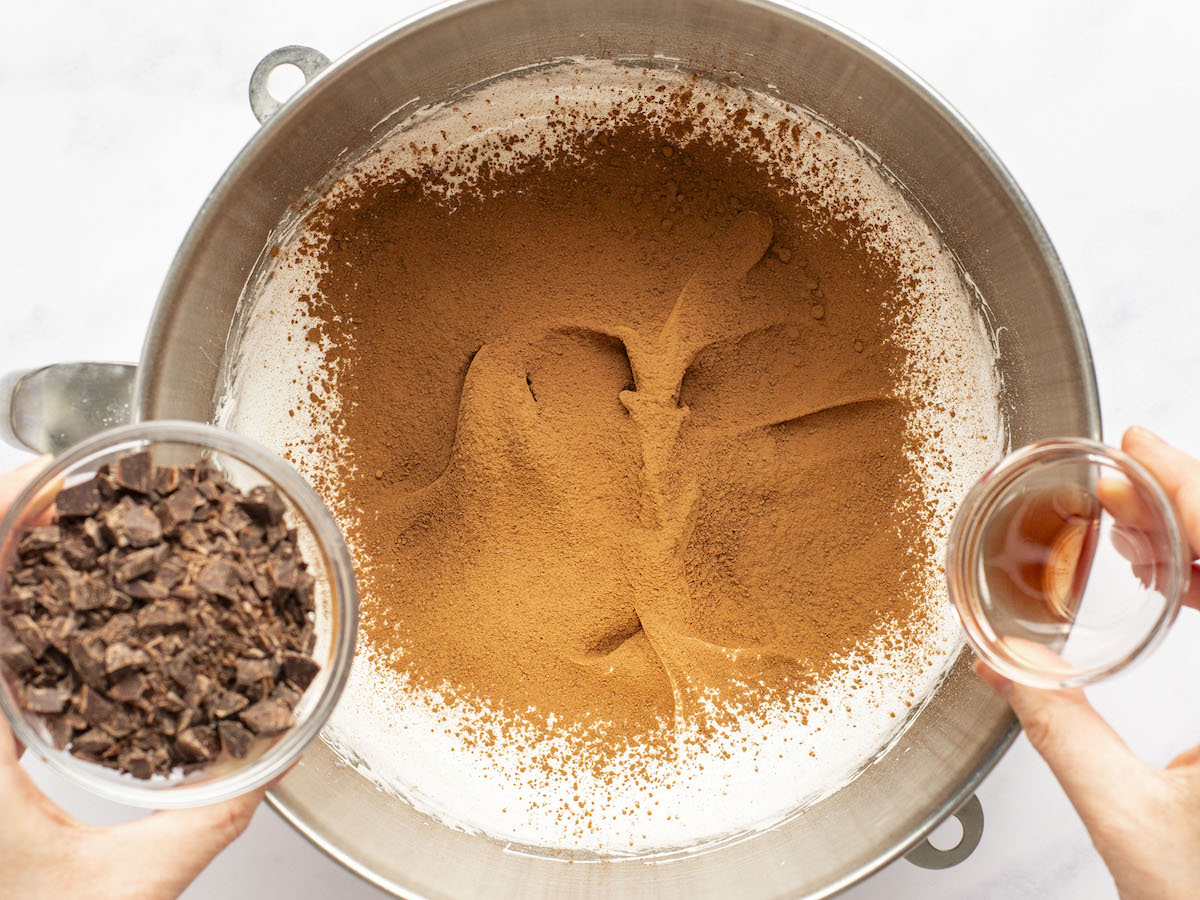
Using a rubber spatula, fold the mixture together until no streaks of cocoa powder remain.

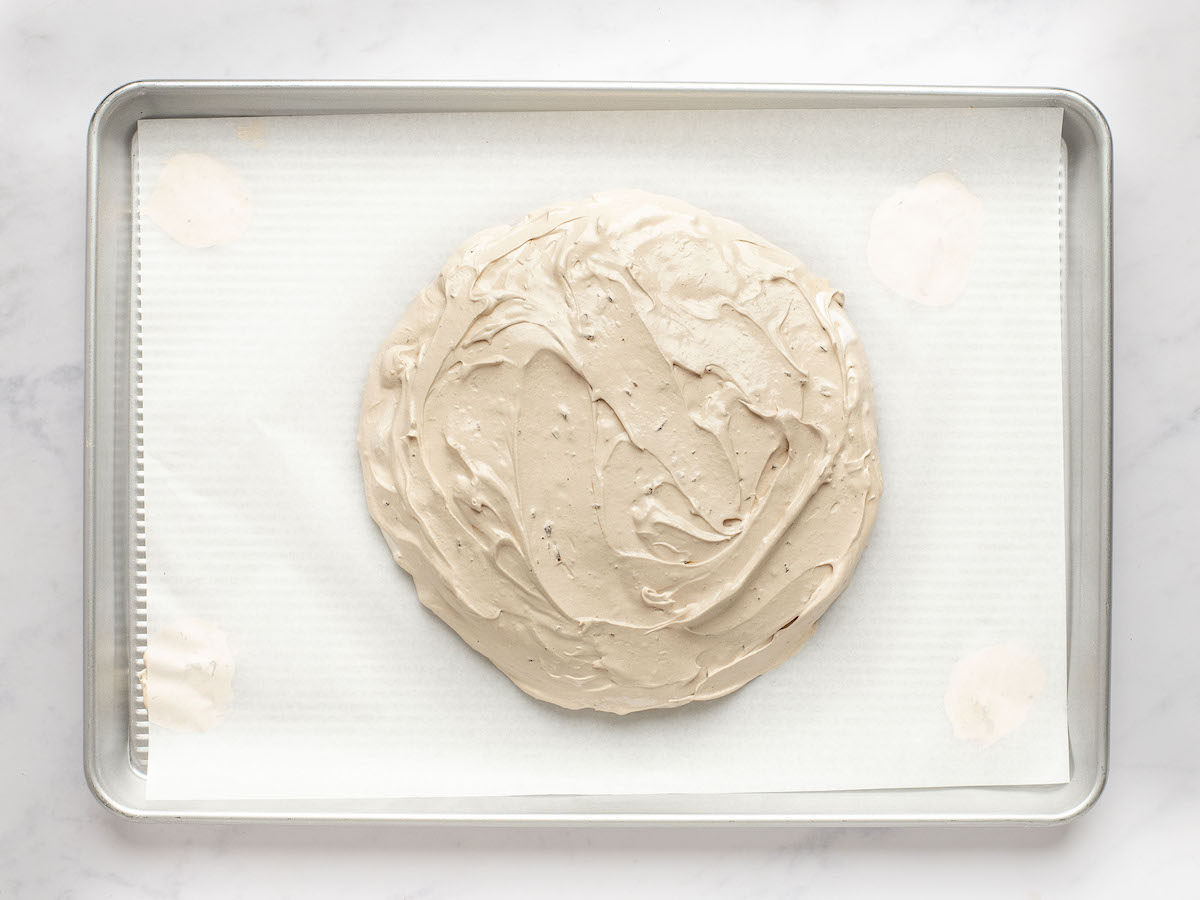
Mound the meringue onto a parchment-lined baking sheet and spread into a 9-inch “cake.”
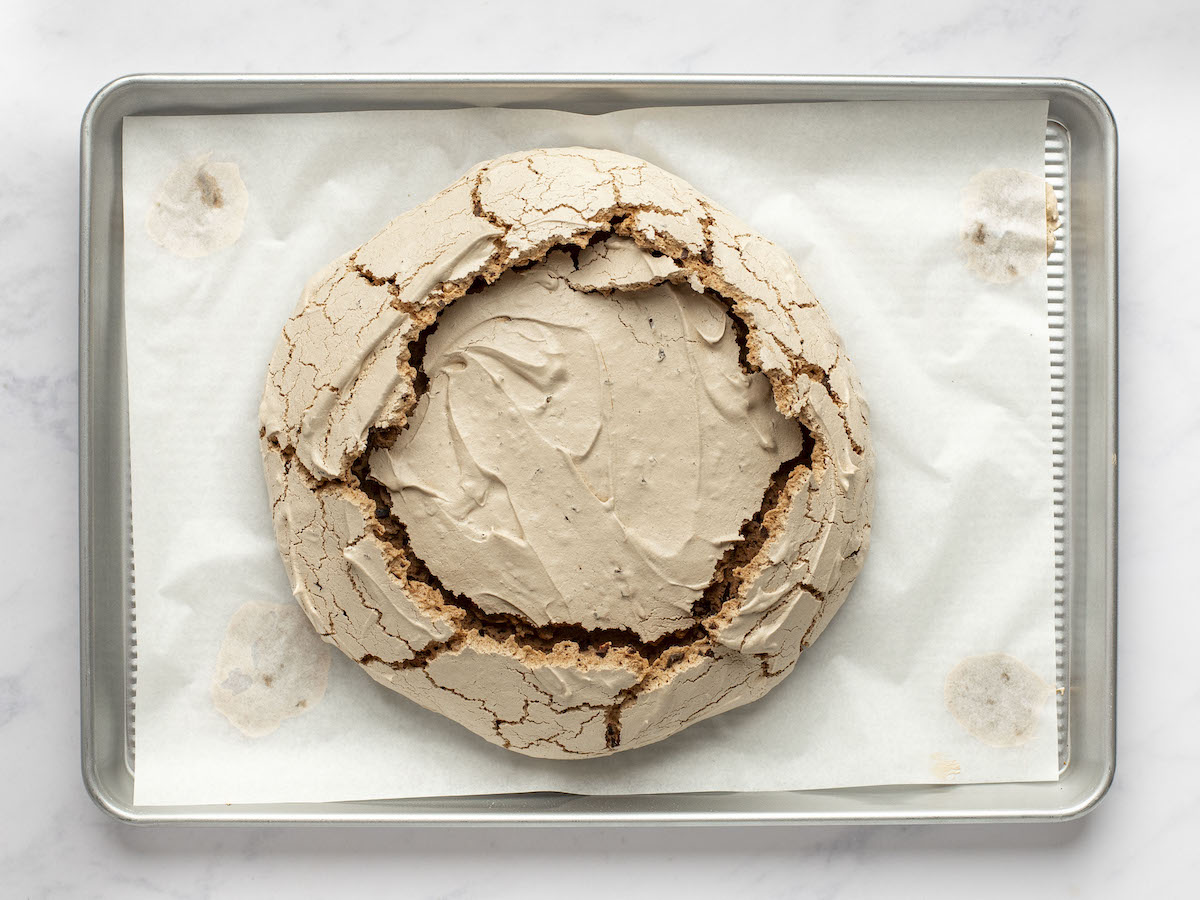
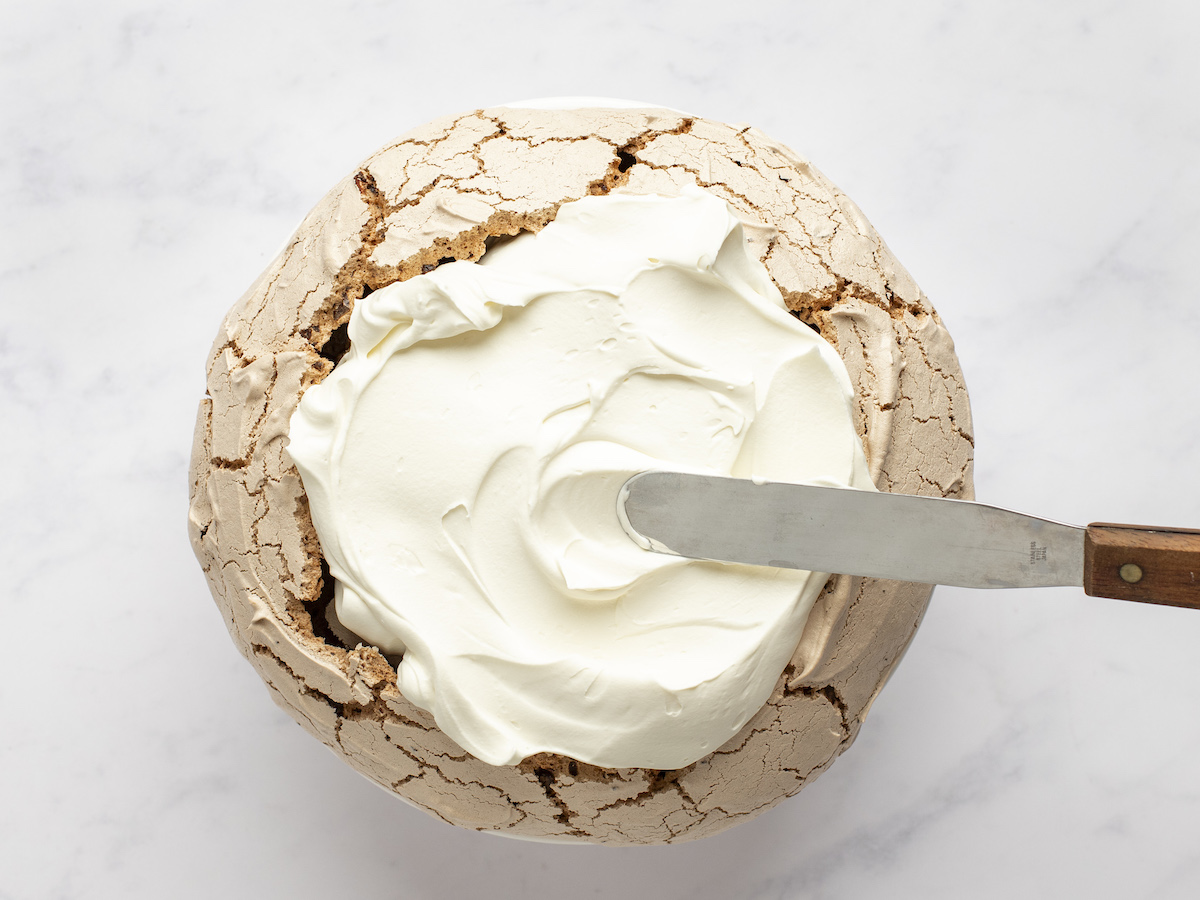
Place in the oven and cook for 65 to 75 minutes, or until the meringue is puffed and crisp all over, yet still a bit wobbly underneath if you touch the center. Don’t worry if the top is cracked (or if it collapses while it cools) — this is normal and it all gets covered with whipped cream in the end.
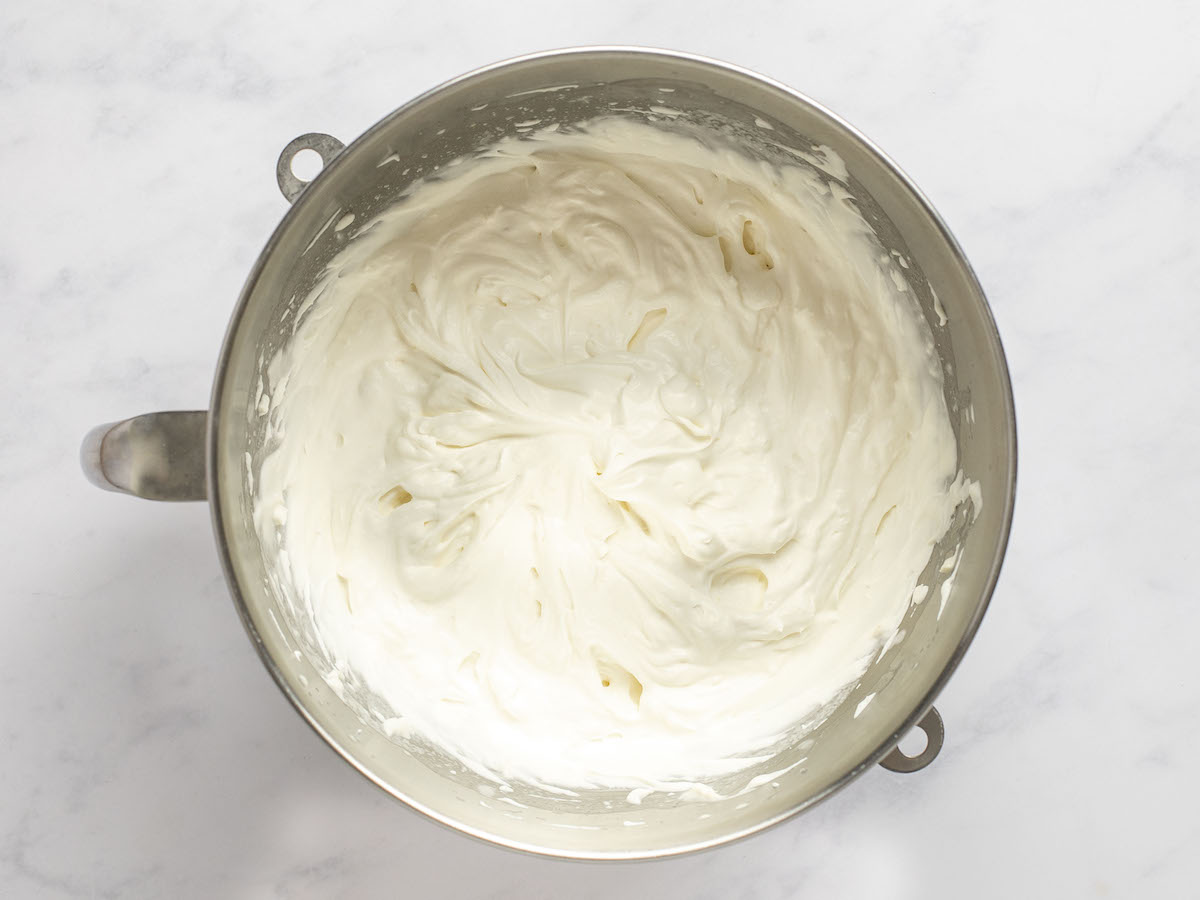
When the meringue is cool, make the topping. In a medium bowl, combine the mascarpone cheese, heavy cream, and vanilla. Gradually add the sugar and continue beating until it holds soft, pillowy peaks.
Mound the mascarpone cream onto the meringue and gently spread it out about 1 inch (2.5 cm) from the edge (don’t worry if the meringue cracks in the process).
Top the pavlova with the raspberries and sprinkle the shaved chocolate over top.
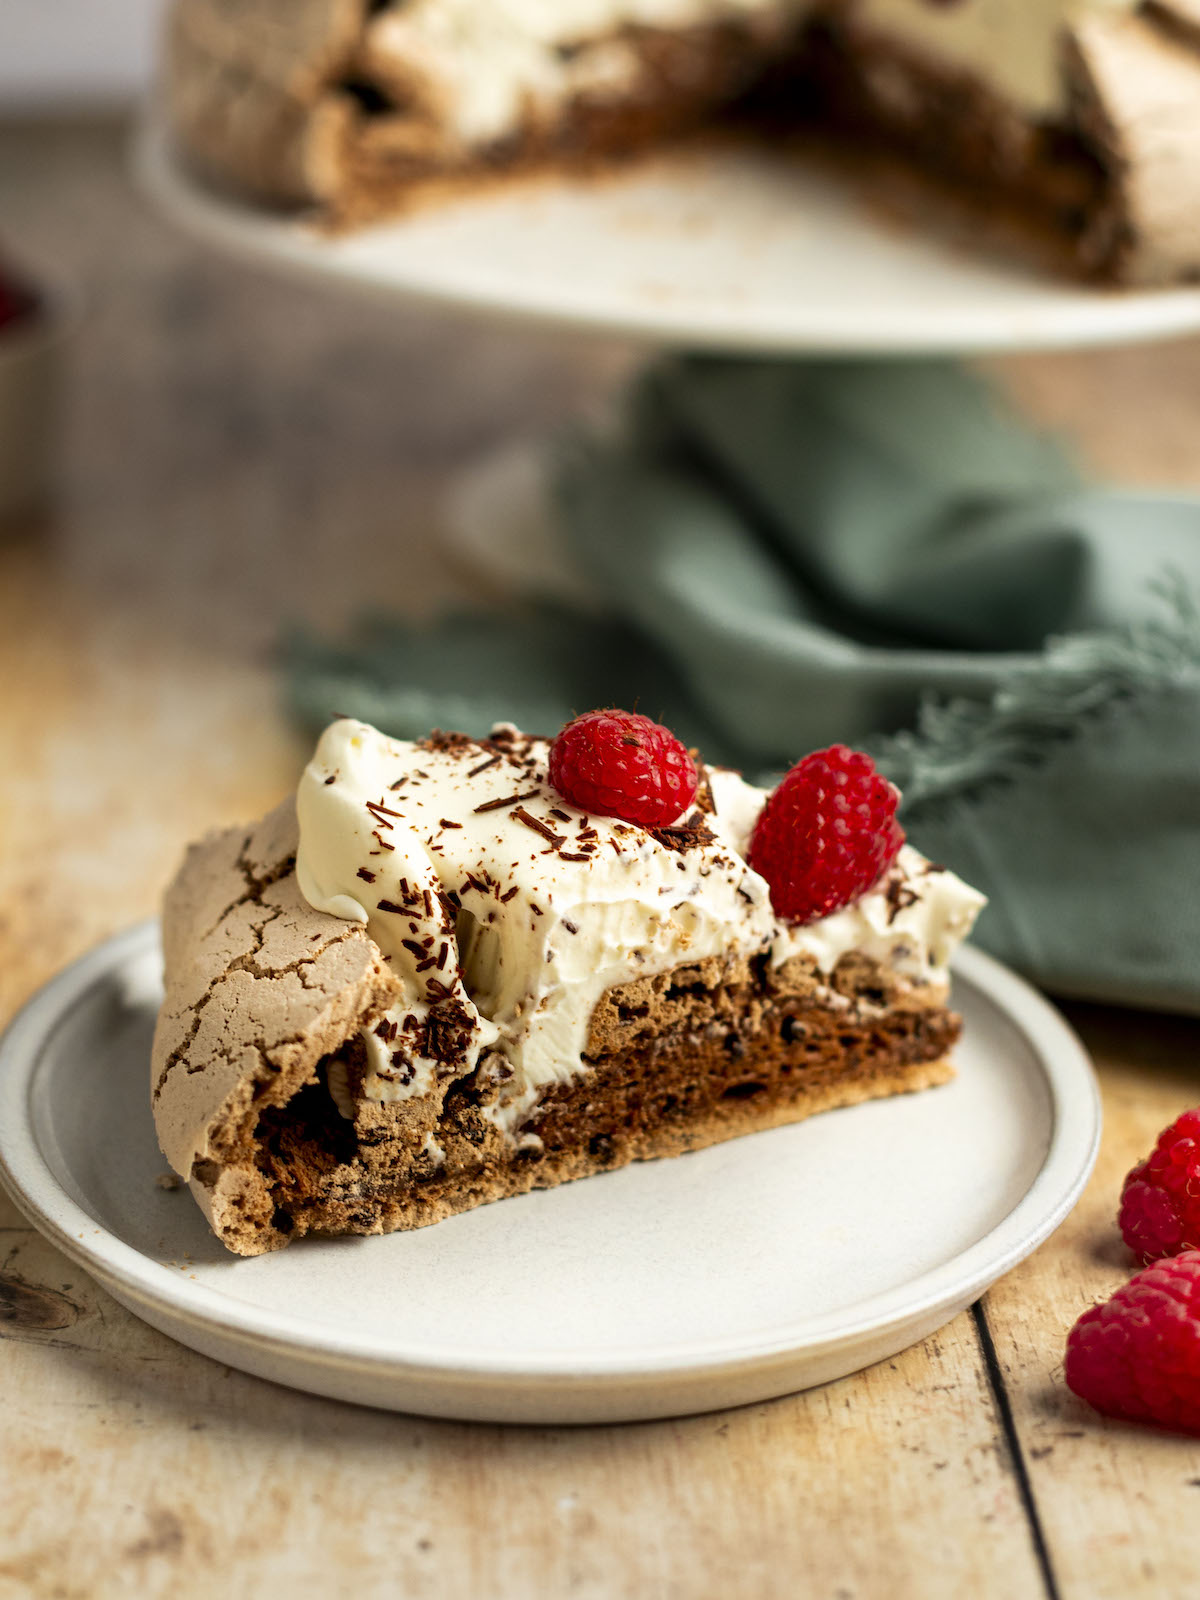
Cut the pavlova into wedges, wiping the knife in between slices, and serve.
You May Also Like
Chocolate Pavlova with Mascarpone Cream & Raspberries
A dream of a dessert, this chocolate pavlova features a fudgy, marshmallowy center encased in a crisp shell, all topped with rich whipped cream and fresh raspberries.
Ingredients
For the Pavlova
- 6 large egg whites
- Pinch salt
- 1¾ cups superfine sugar (see note)
- 3 tablespoons natural unsweetened cocoa powder, such as Hershey's
- 1 teaspoon red wine vinegar
- 2 ounces bittersweet chocolate, finely chopped
For the Marscapone Cream
- 8 ounces (1 cup) mascarpone cheese, cold
- 1½ cups heavy whipping cream, cold
- ¼ cup sugar
- 1 teaspoon vanilla extract
For the Topping
- 1½ cups fresh raspberries
- 2 ounces bittersweet chocolate, grated or shaved into curls (optional)
Instructions
- Preheat the oven to 300°F and set an oven rack in the middle position. Line a baking sheet with parchment paper. Using a dark marker, draw a 9-inch diameter circle on the parchment paper by tracing around a 9-inch cake pan or plate. Flip the paper over so your meringue won't touch the marker.
- In the bowl of an electric mixer fitted with the whisk attachment, beat the egg whites and salt on medium speed until foamy soft peaks form, about a minute. Increase the speed to medium-high and gradually add the sugar; continue beating until stiff peaks form, 8-9 minutes. (The meringue will be glossy.)
- Pass the cocoa powder through a sieve or sifter and add to the meringue. Add the vinegar and chopped chocolate. Using a large rubber spatula, fold the mixture until well combined. It should be a light mocha color with no white or brown streaks.
- Secure the parchment paper to the baking sheet by adding a dab of meringue under each corner. Mound the meringue onto the parchment inside the circle. Using the spatula or a butter knife, spread the meringue to fill the circle. Even the top and sides just slightly -- it shouldn’t be perfectly smooth or overworked. Place in the oven and cook for 65 to 75 minutes, or until the meringue is puffed and crisp all over, yet still a bit wobbly underneath if you touch the center. Don't worry if the top is cracked -- that's normal and it all gets covered with whipped cream in the end. Turn off the oven, prop the oven door open, and leave the meringue in the oven to cool to room temperature, at least 30 minutes. (The meringue won’t collapse as much if it cools gradually.)
- Before serving, carefully peel the meringue off of the parchment paper and place it on a serving platter. In a medium bowl, beat the mascarpone cheese, heavy cream, and vanilla on medium speed until just combined. Gradually add the sugar and continue beating until it holds soft, pillowy peaks. Do not overbeat; it should not be too stiff or grainy. Mound the mascarpone cream onto the meringue and gently spread it out about 1 inch from the edge (don't worry if the meringue cracks in the process). Top the pavlova with the raspberries and sprinkle the shaved chocolate over top. Cut the pavlova into wedges, wiping the knife in between slices, and serve.
- Note: If you don't have superfine sugar, place regular granulated sugar in a food processor and pulse until fine, about 30 seconds.
- Note: This pavlova can be made ahead and assembled up to 12 hours ahead of time. Keep in the refrigerator.
Nutrition Information
Powered by ![]()
- Per serving (10 servings)
- Calories: 429
- Fat: 25 g
- Saturated fat: 15 g
- Carbohydrates: 51 g
- Sugar: 47 g
- Fiber: 2 g
- Protein: 5 g
- Sodium: 136 mg
- Cholesterol: 74 mg
This website is written and produced for informational purposes only. I am not a certified nutritionist and the nutritional data on this site has not been evaluated or approved by a nutritionist or the Food and Drug Administration. Nutritional information is offered as a courtesy and should not be construed as a guarantee. The data is calculated through an online nutritional calculator, Edamam.com. Although I do my best to provide accurate nutritional information, these figures should be considered estimates only. Varying factors such as product types or brands purchased, natural fluctuations in fresh produce, and the way ingredients are processed change the effective nutritional information in any given recipe. Furthermore, different online calculators provide different results depending on their own nutrition fact sources and algorithms. To obtain the most accurate nutritional information in a given recipe, you should calculate the nutritional information with the actual ingredients used in your recipe, using your preferred nutrition calculator.
Gluten-Free Adaptable Note
To the best of my knowledge, all of the ingredients used in this recipe are gluten-free or widely available in gluten-free versions. There is hidden gluten in many foods; if you're following a gluten-free diet or cooking for someone with gluten allergies, always read the labels of your ingredients to verify that they are gluten-free.
I made this today for Passover and everyone loved it! Super easy to make too. I did use 1/4 cup less sugar in the egg whites and the sweetness was perfect. Also, I used regular sugar and it was not grainy at all. One thing I learned is when you think you’re done beating the egg whites beat them 2 minutes more.
I’ve been making this every Passover for about 7 years, and it’s always a hit. I thought it would be challenging at first, but it’s so simple to follow the directions and have this incredibly tasty dessert that impresses everyone. Here I am again looking at the recipe so I can whip this up for Saturday night, and I figure I owe you a good review on this one because it’s a perennial favorite.
🙂
This was a delicious dessert, as per usual for your fantastic recipe collection … however, I unfortunately had quite a bit of difficulty with it, although I followed your instructions carefully. The meringue was cooked for 70 minutes & left in the oven, door propped open, to cool for 1 hour. The top was VERY cracked, to the point of collapsing in some parts. Then, when I tried to remove it from the parchment paper, I discovered it was stuck upon it. (Should I have greased the paper?) After sliding a spatula underneath it I managed to remove it from the paper, but this process caused pieces of the meringue to break off & the sides to detach in several areas! Woe is me, it was a total mess, as if it had been in an earthquake!
The pavlova was partially rescued by using the cream mixture to “glue” it back together.
In the end, although it could have looked much better, I was able to slice it for serving & it was delicious! But would you please give me some suggestions as to why these pitfalls occurred & what steps I can take next time to avoid such a disastrous situation. Thank you for your help!
Hi Toni, I’m sorry that you had such a problem with this! It’s not unusual for the top of the meringue to crack and to collapse in some parts. That’s one of the reasons it gets covered with the mascarpone cream (to basically conceal those things). You mentioned that it stuck to the parchment — you definitely used parchment paper and not wax paper? If it was parchment, the next time you make this, you could give the parchment a quick spray with nonstick cooking spray. Glad that you were able to essentially glue it back together and hope you have better luck next time!
Hi Jenn, absolutely love this recipe, everything goes so well together! I just have a question, for some reason the meringue expanded in the oven well beyond the 23cm circle and pushed up against the edge of the baking sheet, do you have any idea what I might have done wrong? I only have a hand-held mixer and not a stand mixer, might this be the problem do think? I’m not sure whether to decrease the meringue quantities the next time I try, to allow for the expansion, or to try the original recipe again and see how I go? Thanks again for your help, you’re a lifesaver for all social catchups at our place!
Hi Mel, so glad you like the recipe! I suspect that the meringue expanded in the oven because you hadn’t beaten the egg whites for long enough. It’s fine to use a handheld mixer; you just want to make sure that once you’ve added the sugar, you beat the mixture until stiff peaks form. It will likely take longer using a handheld mixer.
Thanks Jenn, really appreciate the time you take to help your readers. I will definitely give it another go – it’s worth it because this recipe is loved by all, and so pretty topped with the raspberries and chocolate curls xx
👍
I’ve made this several times and it is simply fantastic. Was perfectly gorgeous for a special party and everyone wanted the recipe. It’s easy to prepare … the only trick is to be SURE you have metal tins big enough for them to keep them fresh. The second time I made them I did small, individual portions and they were really divine.
Hi Jenn, keen to try this out for NYE! I was wondering if white wine vinegar could be used instead of red wine vinegar? Also could I reduce the sugar by more than 1/4 cup as I saw you suggest in your previous comments, or do you think this will ruin the meringue? Thanks so much!
Hi Melissa, I would suggest reducing the sugar in the mascarpone cream rather than the meringue, and white wine vinegar is fine. Hope that helps!
Thanks for replying so quickly Jenn, looking forward to trying my first meringue and so excited you have a recipe so I know I can count on a great outcome – as with all of your recipes! How much sugar do you think I could get away with reducing in the marscarpone cream? Do you think I could also reduce the sugar by 1/4 to 1/2 cup in the meringue, or does this ruin the texture?
You could reduce the sugar by 1 to 2 tablespoons in the mascarpone and I think you could get away with cutting the sugar in the pavlova by about 1/4 cup without impacting the texture.
Thanks again Jenn, and wishing a happy new year to you & your family xx
Made this today for Christmas dessert… had a zillion other things that people brought or made but this one was the eye and taste popper.. have made this a couple times before and it never disappoints!!
Your recipe says it can stay in the refrigerator for 12 hours before serving, yet in some of your answers to questions, you say it can be made a day ahead. Is the 12 hours a misprint? Thanks.
Hi Roz, Ideally I wouldn’t make this more than 12 hours ahead, but you can get away with overnight.
Thanks, Jenn. I made it this morning for tonight and it was perfect in every way – except way too sweet for my taste. I’ll cut the sugar next time, but I’ll surely be making it again! Thanks for answering so quickly during such a busy time. Happy Holidays to you and your family!
Such a spectacular dessert! The lucky people I’ve shared it with have all commented on how light (and delicious) it is. One note: using a stand mixer is better than using handheld beaters. (Mine weren’t powerful enough to whip the whites.) Really a stand-out treat! Thanks, Jenn!
Definitely Australia 😋