Chocolate Peanut Butter Tart

This post may contain affiliate links. Read my full disclosure policy.
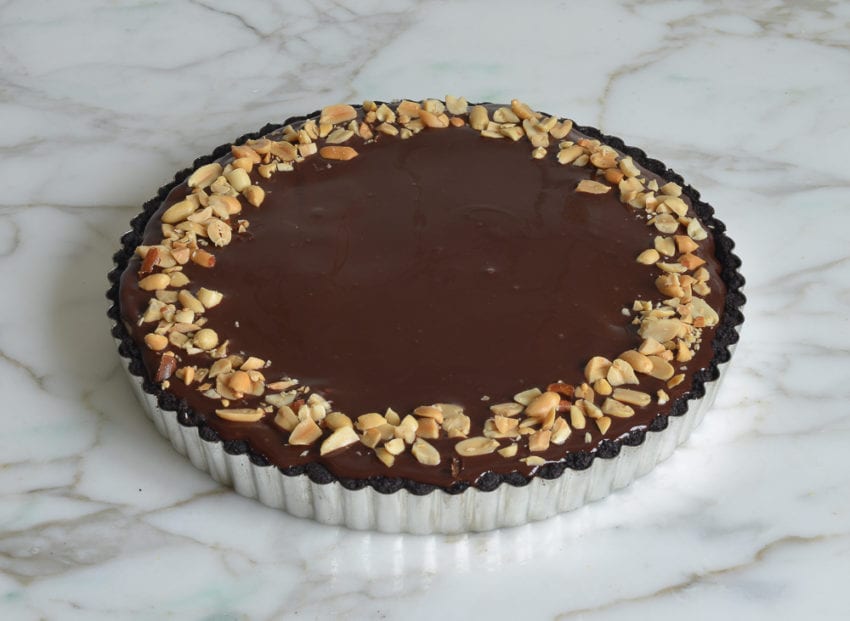
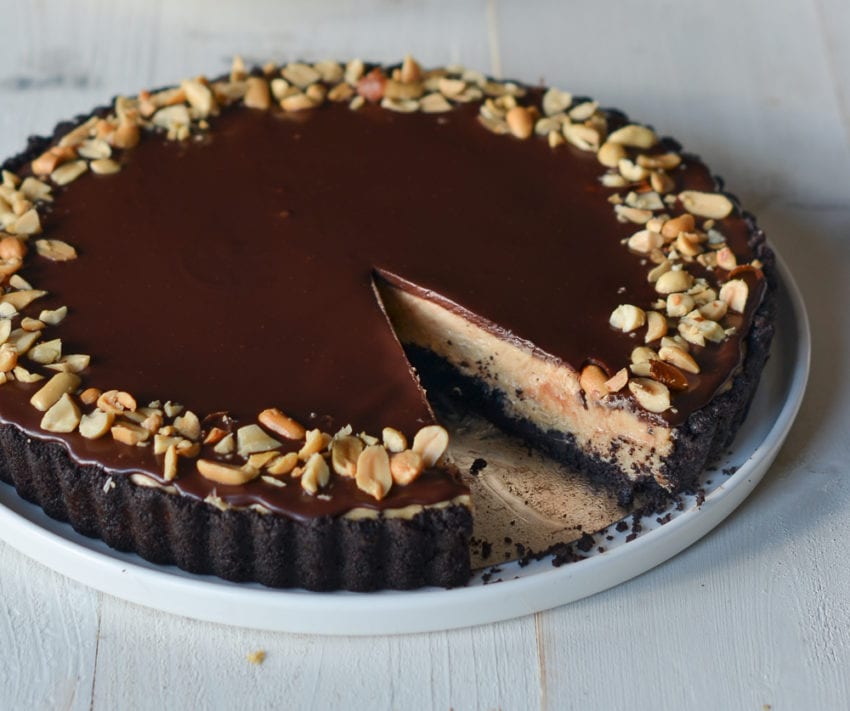
Think of this chocolate peanut butter tart as a grown-up version of a Reese’s Peanut Butter cup.
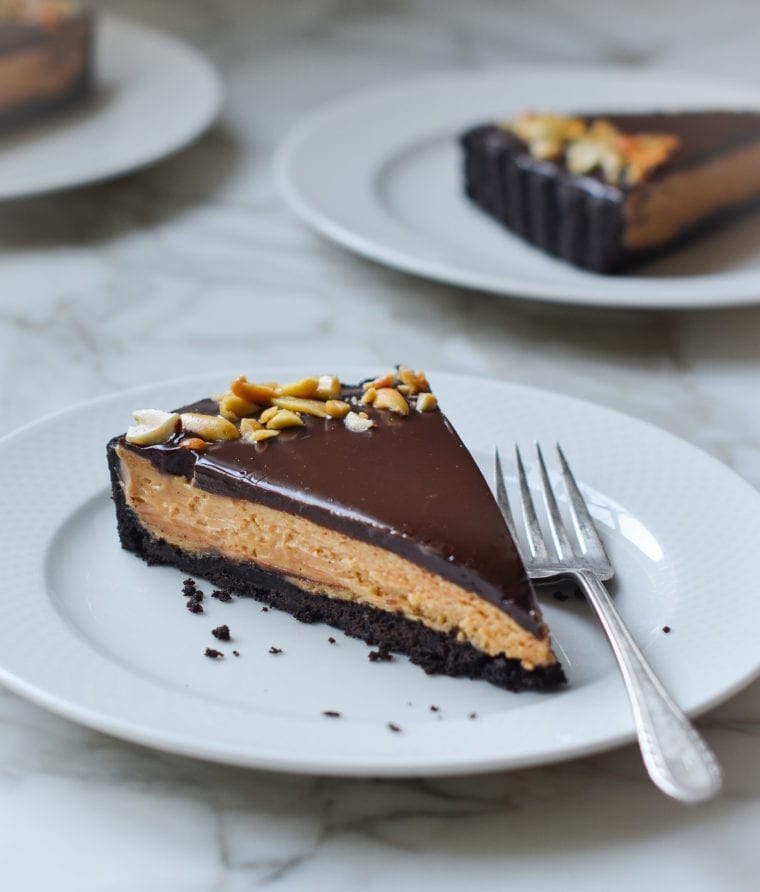
Whenever I’m in need of a decadent “wow” dessert, I make this quick-bake chocolate peanut butter tart modestly adapted from Food & Wine. With a chocolate wafer crust, rich peanut butter filling, and silky chocolate ganache topping, it tastes like a grown-up Reese’s Peanut Butter Cup. To get the pretty fluted edges, you’ll need a tart pan with a removable bottom, which you can find at any kitchen store or online (my local hardware store even sells them). If you don’t have one, you can also use a springform pan.
What you’ll need to make a chocolate peanut butter tart
How to make a chocolate peanut butter tart
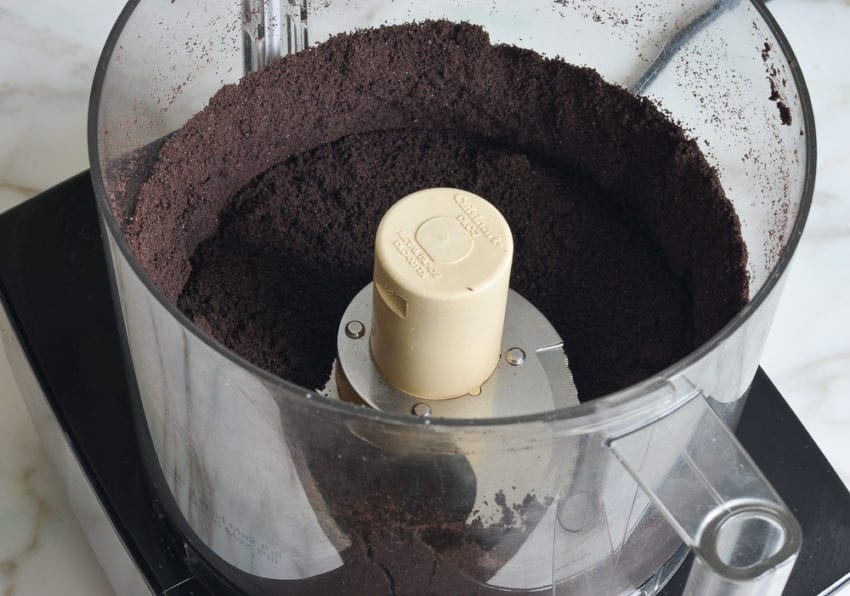
Begin with the crust. Place the chocolate wafers in a food processor fitted with the steel blade.
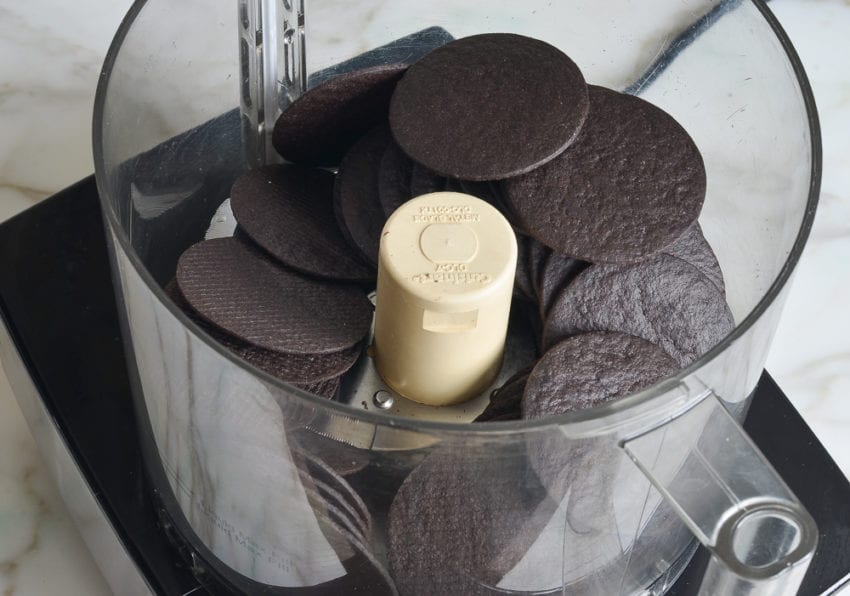
Process until the cookies are finely ground and set aside.
In a medium microwave-safe bowl, melt the butter. Add the chocolate pieces.
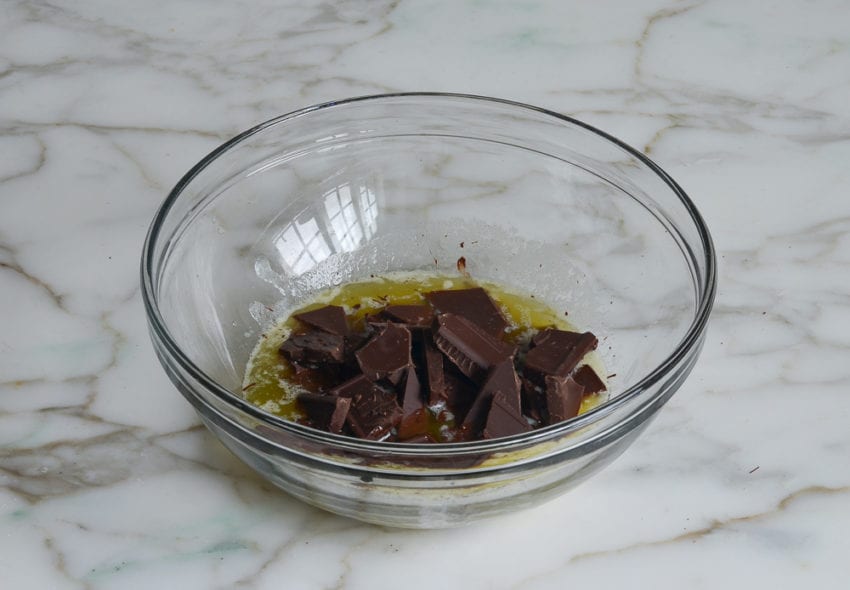
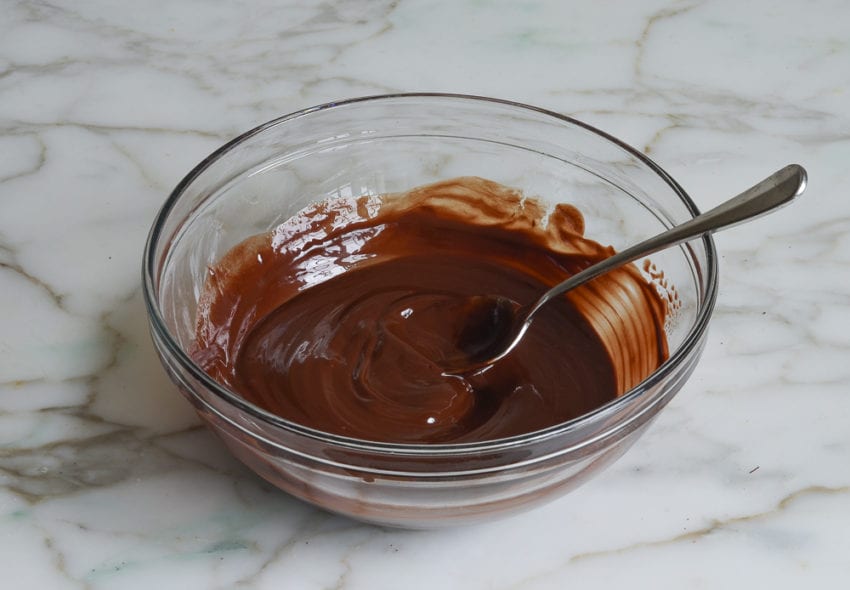
Stir until melted. (If necessary, place the bowl back in the microwave for 20 to 30 seconds.)
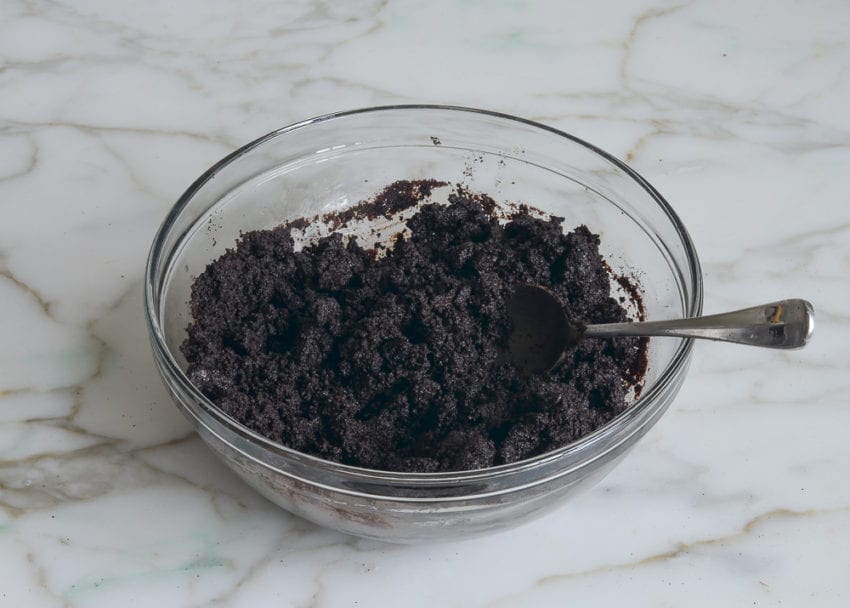
Add the cookie crumbs and stir until evenly combined.
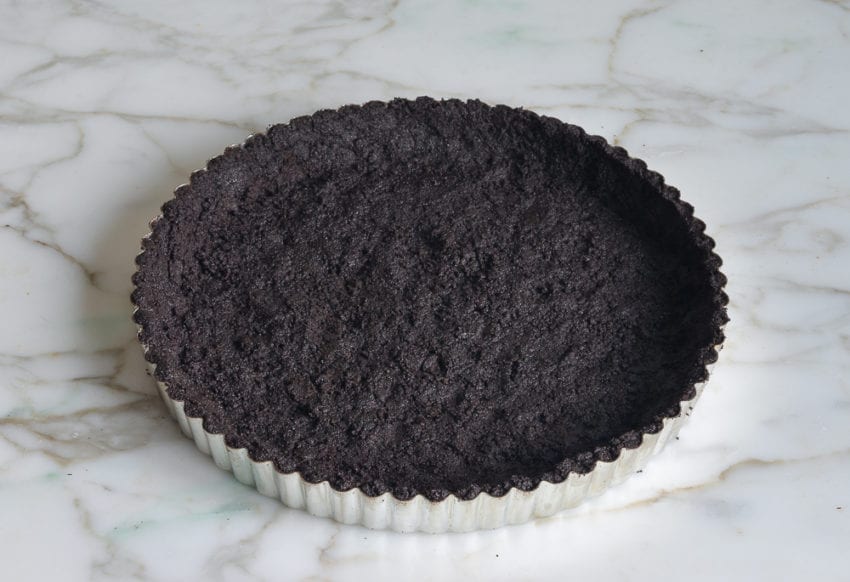
Press the cookie crumbs evenly over the bottom and up the rim of a 10-inch tart pan with a removable bottom. Bake the crust for 10 minutes, then cool on a rack.
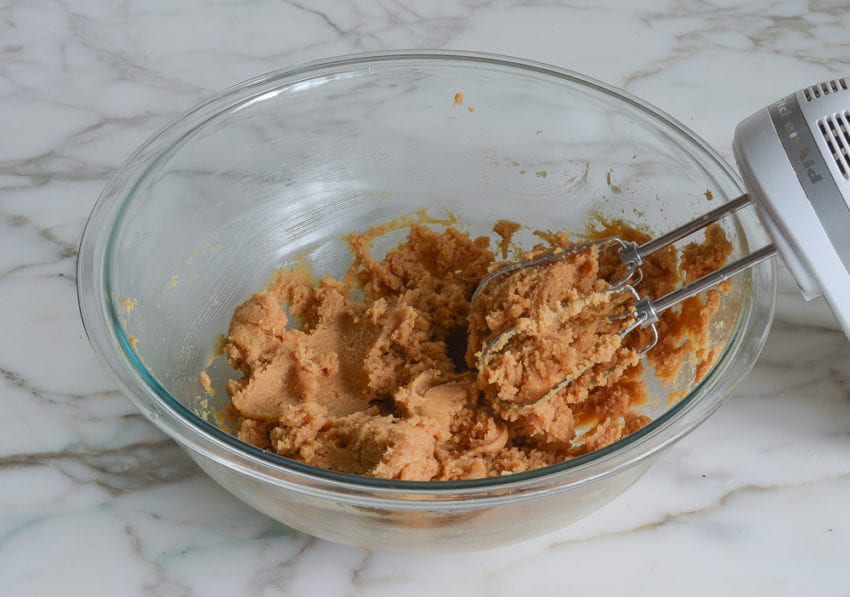
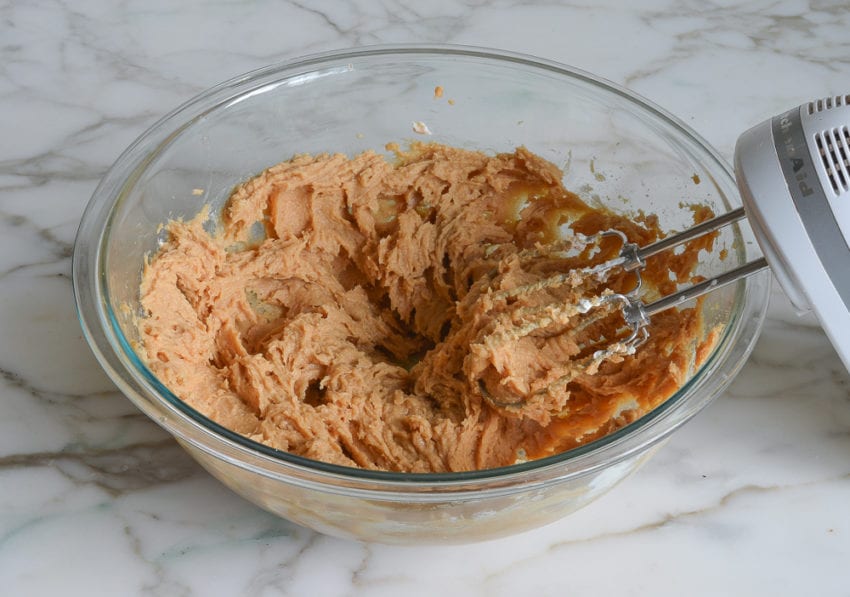
Meanwhile, make the peanut butter filling: In a large bowl of an electric mixer, combine the the cream cheese with the peanut butter, sugar and vanilla extract.
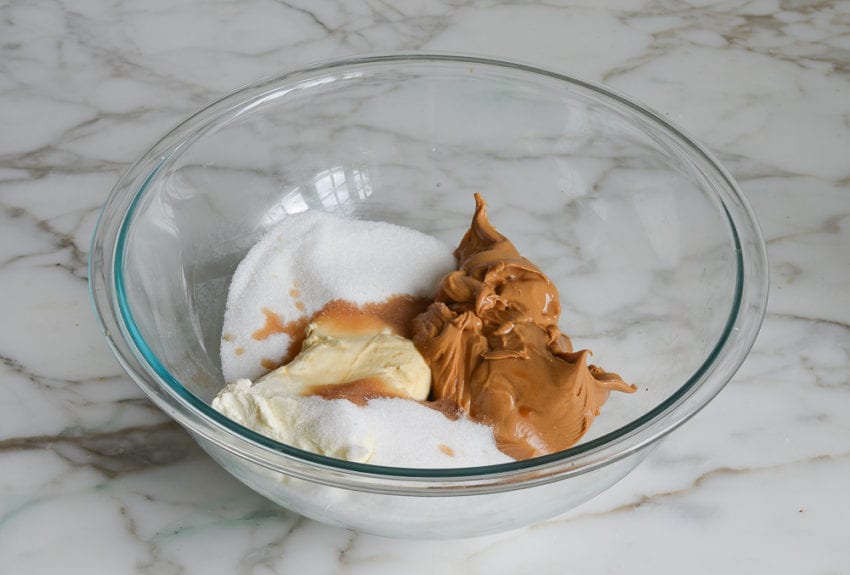
Beat on medium speed until well-blended, a few minutes.
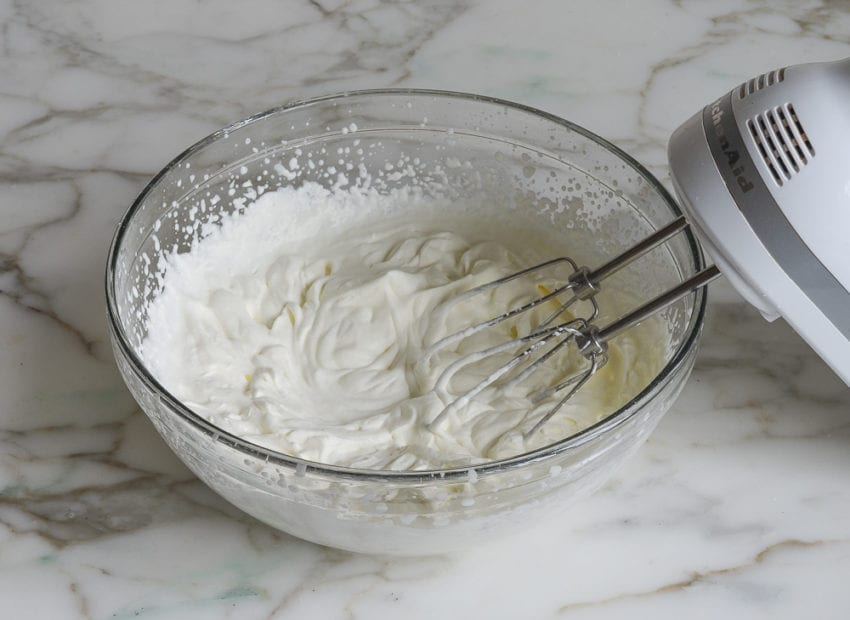
In another large bowl, using an electric mixer, whip the cream until stiff peaks form.
Add one-third of the whipped cream to the peanut butter mixture.
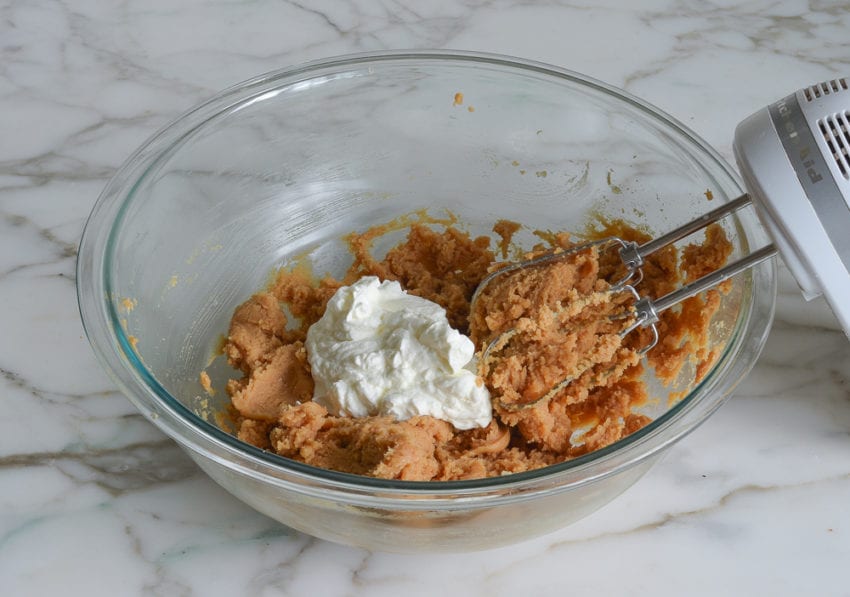
Beat on low speed to combine.
Add the remaining cream.

Using a large rubber spatula, fold until evenly combined.
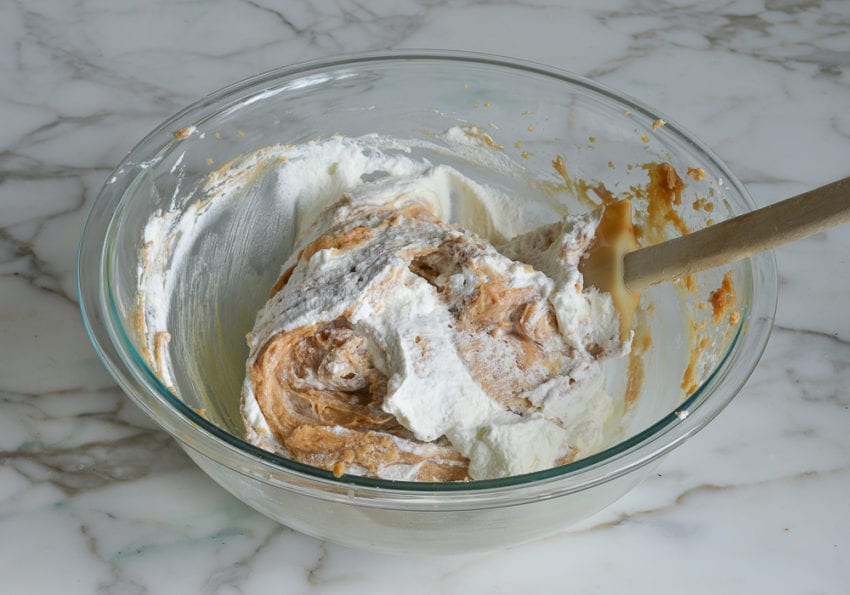
The filling should be nice and light.
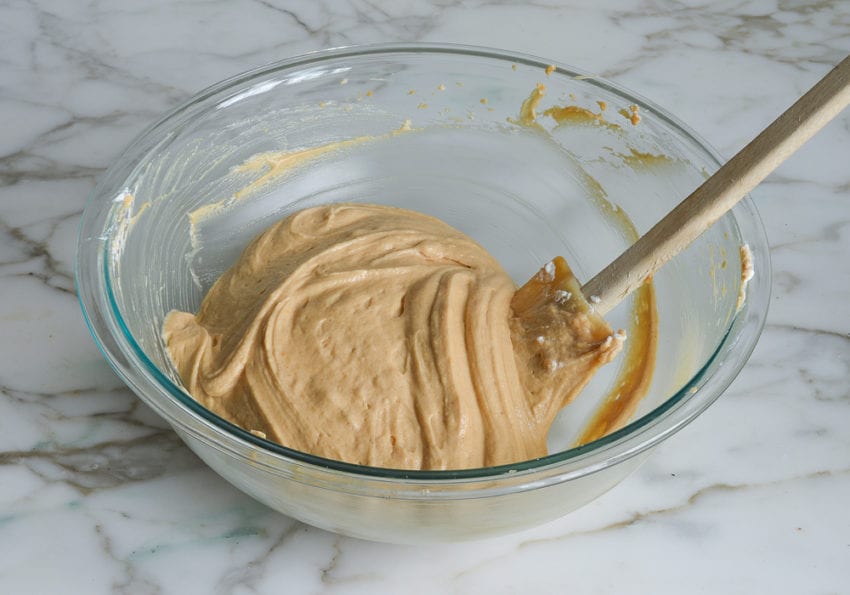
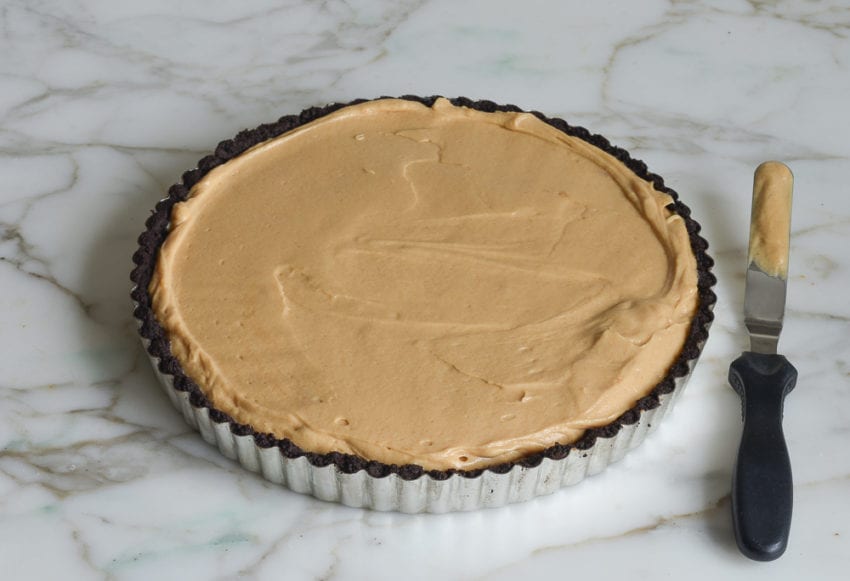
Spoon the filling into the crust.
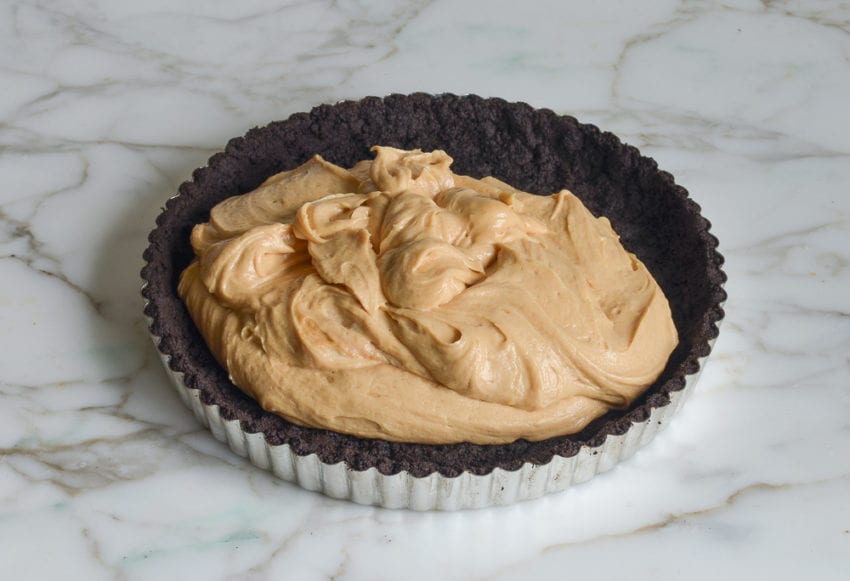
Smooth the surface and refrigerate, uncovered, for about 1 hour.
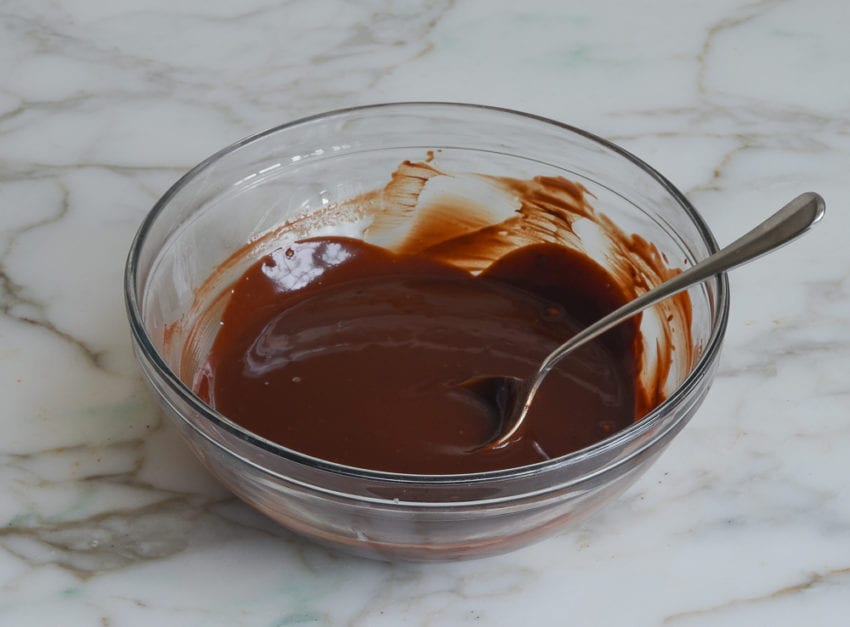
Once the pie has cooled, make the chocolate topping. In a medium microwave-safe bowl, combine the chocolate with the heavy cream.
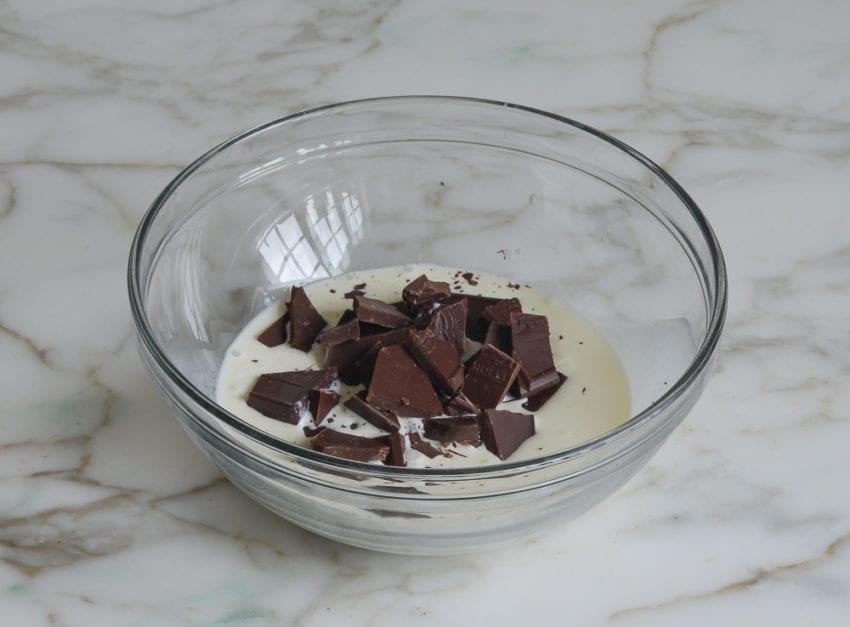
Microwave at high power in 20-second intervals until the chocolate is just melted and the cream is hot. Stir until well blended, then let cool until barely warm, stirring occasionally.
Spread the chocolate topping over the chilled peanut butter filling.
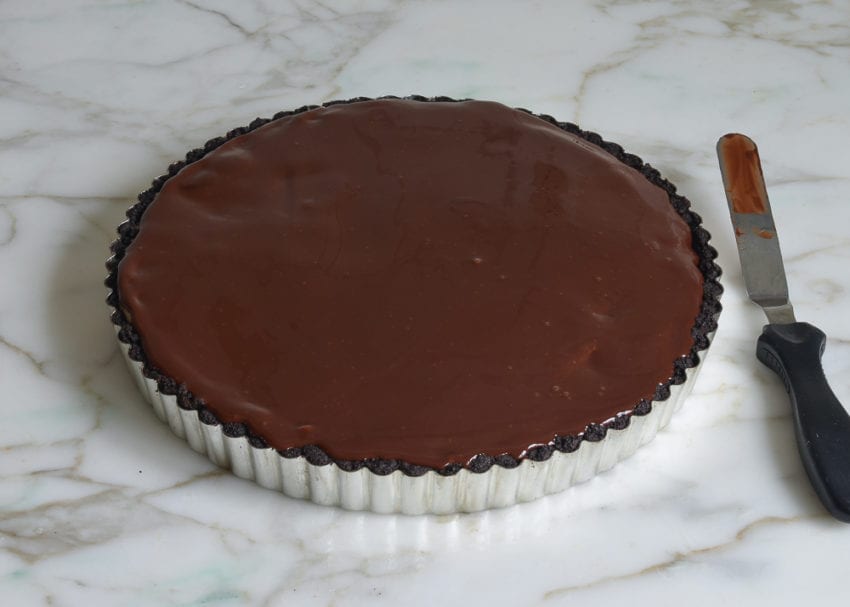
Sprinkle the chopped peanuts around the edges of the pie.
Chill, uncovered, in the refrigerator for 3 more hours.
To serve, carefully remove the rim from the pan by gently pressing upwards on the bottom while holding the rim in place. (If using a springform pan, run a thin knife around the crust to loosen it, then remove the springform ring.) Use a sharp knife to cut the pie into wedges. Wipe the knifer clean between each cut. Serve chilled.

You may also like
- Chocolate Peanut Butter Squares
- Chocolate Peanut Butter Icebox Cake
- Chocolate Tart
- Buckeyes
- Peanut Butter Pie
Chocolate Peanut Butter Tart
Think of this chocolate peanut butter tart as a grown-up version of a Reese’s Peanut Butter cup.
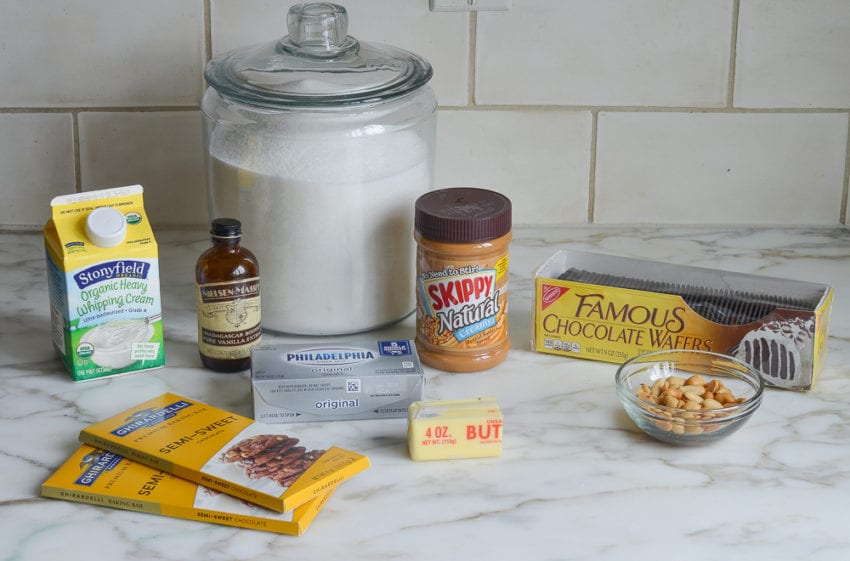
Ingredients
For the Crust
- 4 oz semisweet chocolate, chopped (best quality, such as Ghirardelli)
- 4 tablespoons unsalted butter, cut into tablespoons
- 2 cups cookie crumbs from Oreo baking crumbs, Dewey’s Brownie Crisp Cookies, Oreo Thins (no need to remove the cream), or Nabisco Chocolate Wafers
For the Peanut Butter Filling
- 8 oz cream cheese, at room temperature
- 1 cup smooth peanut butter (I use Skippy Natural)
- 1 cup sugar
- 2 teaspoons vanilla extract
- 1 cup cold heavy cream
For the Topping
- 4 oz semisweet chocolate, chopped (best quality, such as Ghirardelli)
- ½ cup heavy cream
- ¼ cup salted roasted peanuts, chopped
Instructions
- Make the chocolate crust: Preheat the oven to 375°F. In a medium microwave-safe bowl, melt the butter. Add the chocolate and stir until melted. (If necessary, place the bowl back in the microwave for 20 to 30 seconds.) Add the cookie crumbs and stir until evenly combined. Press the cookie crumbs evenly over the bottom and up the rim of a 10-inch tart pan with a removable bottom (see note below). Bake the crust for 10 minutes, then cool on a rack.
- Meanwhile, make the peanut butter filling: In a large bowl of an electric mixer, beat the cream cheese with the peanut butter, sugar and vanilla extract on medium speed until well-blended, a few minutes. In another large bowl, using an electric mixer, whip the cream until stiff peaks form. Add one-third of the whipped cream to the peanut butter mixture and beat on low speed to combine. Add the remaining cream and, using a large rubber spatula, fold until evenly combined. Spoon the filling into the crust, smoothing the surface. Refrigerate, uncovered, for about 1 hour.
- Make the chocolate topping: In a medium microwave-safe bowl, combine the chocolate with the heavy cream and microwave at high power in 20-second intervals until the chocolate is just melted and the cream is hot. Stir until well blended, then let cool to barely warm, stirring occasionally. Spread the chocolate topping over the chilled peanut butter filling and sprinkle the chopped peanuts around the edges of the pie. Chill, uncovered, in the refrigerator for 3 more hours.
- To serve: Carefully remove the rim from the pan by gently pressing upwards on the bottom while holding the rim in place. (If using a springform pan, run a thin knife around the crust to loosen it, then remove the springform ring.) Use a sharp knife to cut the pie into wedges. Wipe the knife clean between each cut. Serve chilled.
- Make-Ahead Instructions: This pie can be made a day ahead, then covered and refrigerated until ready to serve.
- Note: You can find a tart pan with a removable bottom at any kitchen shop or online. However, if you can’t your hands on one, you can also use a 10-inch springform pan and bring the crust about 1 inch up the rim (or for a 9-inch springform pan, bring the crust about 1-½ inches up the rim).
Nutrition Information
Powered by ![]()
- Per serving (10 servings)
- Calories: 703
- Fat: 50 g
- Saturated fat: 24 g
- Carbohydrates: 60 g
- Sugar: 46 g
- Fiber: 4 g
- Protein: 12 g
- Sodium: 221 mg
- Cholesterol: 76 mg
This website is written and produced for informational purposes only. I am not a certified nutritionist and the nutritional data on this site has not been evaluated or approved by a nutritionist or the Food and Drug Administration. Nutritional information is offered as a courtesy and should not be construed as a guarantee. The data is calculated through an online nutritional calculator, Edamam.com. Although I do my best to provide accurate nutritional information, these figures should be considered estimates only. Varying factors such as product types or brands purchased, natural fluctuations in fresh produce, and the way ingredients are processed change the effective nutritional information in any given recipe. Furthermore, different online calculators provide different results depending on their own nutrition fact sources and algorithms. To obtain the most accurate nutritional information in a given recipe, you should calculate the nutritional information with the actual ingredients used in your recipe, using your preferred nutrition calculator.
I love chocolate and peanut butter, and this recipe showcases both so well! My 11 inch tart pan worked great, and the only changes I made to the recipe was to use the full 9oz package of cookies for more crust and added some more peanuts at the end for the finish.
Hi Jenn, would you be able to add metric measurements to this recipe, please and can you tell me what the UK equivalent of semi-sweet chocolate and heavy cream is? I am really loving all your recipes, thank you
Done! Semi-sweet chocolate is dark chocolate with a cacao content of around 60%. I believe heavy cream in the UK is double cream. Hope that helps! 🙂
That’s great, thank you
This is really a WOW recipe. A real hit. No changes needed.
This has now made it on my Christmas menu. Served it to some foodies a few weeks ago at a dinner party – huge hit! Brought it to the office Christmas potluck this week – disappeared in a flash with multiple requests for the recipe. So simple, but so delicious.
Could I put in freezer to speed time to serve?
Not sure the pie would freeze very well long term, but it would be fine to speed up the chilling process. Enjoy!
Hi Jenn, I freeze this pie routinely, especially a few weeks before a holiday especially when I am hosting a big event and need to make a few things ahead. I prepare the topping on the morning of the event after the pie has thawed and refrigerate until serving. Always a big hit and requested time and time again! Please forgive me for using a store bought Oreo pie crust. It works beautifully, especially if you are fixed for time. Blessed Thanksgiving!
Thank you, Donna. Very helpful!
But I do allow the pie to set in the refrigerator first overnight and then freeze. Again, top the pie after thawing.
Excellent. I made this for my husband to reward him for completing a project at our house. We both loved it and were impressed. Your recipes (I’ve tried at least five so far) are so clear and thorough that even someone like me who tends to bumble around the kitchen can create a high-quality, professional dessert like this one!
Amazing, easy and so so rich. It can easily stretch to 12 servings, especially with whipped cream, which I thought was a nice complement to the density of the tart. A real favorite of both kids and adults.
I’m not a baker, but this was really easy and so great!
I made this in an 11oz tart pan. This is an incredible dessert! I used 9oz of chocolate wafers and it was perfect for my tart pan. This is our new family favorite for sure!!!
Could this recipe be cooked in a 8×8 or 13×9 pan to make squares instead of a pie? I’m trying to maximize the output – looks delicious!
Hi Janet, Yes, but the best size would be a 9-inch square pan. My only concern is that it will be difficult to cut.
Thanks; decided to use the tart pan, but the one I have is 11-inch! Can I use this (I imagine shorter height) or should I get 9-in?
Thanks again; love your recipes and cookbook!
Glad you like the recipes and the cookbook! Using an 11-inch pan will work, but it will be quite thin.
I only have an 11-in tart pan – could that work, or is it too wide for the ingredients?
Hi Janet, Unfortunately, I do think it’s too large. Sorry!
I made this today with an 11 inch pan and it was perfect. I did 1.5 times the crust, but the filling as recipe is written filled it to the brim perfectly.
Hello Jenn, I would love to try this recipe but we have a family member with a severe nut allergy . Do you think tahini could be substituted for the peanut butter?
Thank you, Marlene
Hi Marlene, Unfortunately, I don’t think tahini would work here. So sorry!
I’ve substituted creamy sunbutter (sunflower seed butter) in other dessert recipes before. It’s not a 100% match but still very tasty.
I made this recipe and although it looked great my husband though the filling should be firmer. I used smuckers natural creamy peanut butter. The crust also tasted good but was hard & separated from the filing when cut. Only baked for 10 minutes. I grounded up 40 wafers which actually was more like 9oz so I used them all since I already had them grounded but I had to add a little more butter and chocolate. I think I saw in another review that if the crust was to thick it would come out hard? Any suggestions for a second attempt? We both love peanut butter pie we get at a local restaurant and I really wanted to find a recipe that tasted similar so we could have it at home. Think I might try using single serve tartlets pans and make smaller portions since it’s just the two of us. Always can give away other servings as gifts.
Hi Barbara, to address your first comment about the filling not being as firm as you expected, did you whip the cream until stiff peaks formed before combining it with the peanut butter mixture? Also, did you refrigerate it for at least an hour? And regarding the crust, it will get hard if it’s a little too thick, so next time, I’d limit the wafers to 8 ounces. Hope that helps!