Chocolate Cream Pie
This post may contain affiliate links. Read my full disclosure policy.
With a cookie crust, silky pudding center and pillowy whipped cream topping, this chocolate cream pie is a chocolate lover’s dream.

My son, Zach, is a serious chocoholic and has requested this chocolate cream pie for his birthday every year since he was a little boy. Naturally, the dessert has become a much-loved tradition and shows up in many of our family photos! With its Oreo cookie crust, silky chocolate pudding center, and pillowy whipped cream topping, the pie is truly a chocolate lover’s dream. Be sure to plan ahead because the filling needs at least eight hours to set before serving.
“This was far and away the best chocolate pie that I’ve ever tasted (much less made).”
What You’ll Need To Make Chocolate Cream Pie

- Oreo Cookies: Provide a rich, chocolatey base for the pie.
- Butter: Binds the cookie crumbs together for the crust and also adds richness and a smooth texture to the filling.
- Sugar: Sweetens the filling and is also added to the whipped cream topping.
- Cornstarch: Thickens the filling and gives it a creamy consistency.
- Egg Yolks: Add richness and help thicken the filling.
- Whole Milk: Creates a smooth, creamy texture for the filling.
- Bittersweet Chocolate: Adds deep, complex chocolate flavor to the filling and a decorative garnish to the top of the pie. Make sure to use best quality such as Ghirardelli.
- Unsweetened Chocolate: Intensifies the chocolate taste. Make sure to use best quality such as Ghirardelli.
- Vanilla Extract: Enhances the flavor of the filling.
- Heavy Whipping Cream: Whips into a light, fluffy topping. Make sure the whipping cream is very cold.
- Jump to the printable recipe for precise measurements
Step-By-Step Instructions
Step 1: Make the Crust
Preheat the oven to 350°F. In the bowl of a food processor fitted with a steel blade, blend the Oreos and butter until the mixture is finely chopped and evenly moistened.

Firmly press the crumbs into a deep-dish 9-inch pie pan, starting by lining the sides to create a crust about 1/4-inch thick, then press the remaining mixture onto the bottom to form the base. Bake the crust for 5 to 6 minutes, or until slightly crisp, then allow it to cool completely before filling.

Step 2: Make the Filling
Combine the sugar, cornstarch, and salt in a heavy medium saucepan. Whisk gently until combined.

In a bowl or large measuring cup, whisk together the egg yolks and milk.

Add the milk mixture to the saucepan in a slow and steady stream.

Whisk until the mixture is smooth.

Cook over medium-high heat, whisking frequently, until the mixture starts to bubble and thicken, 6 to 8 minutes.
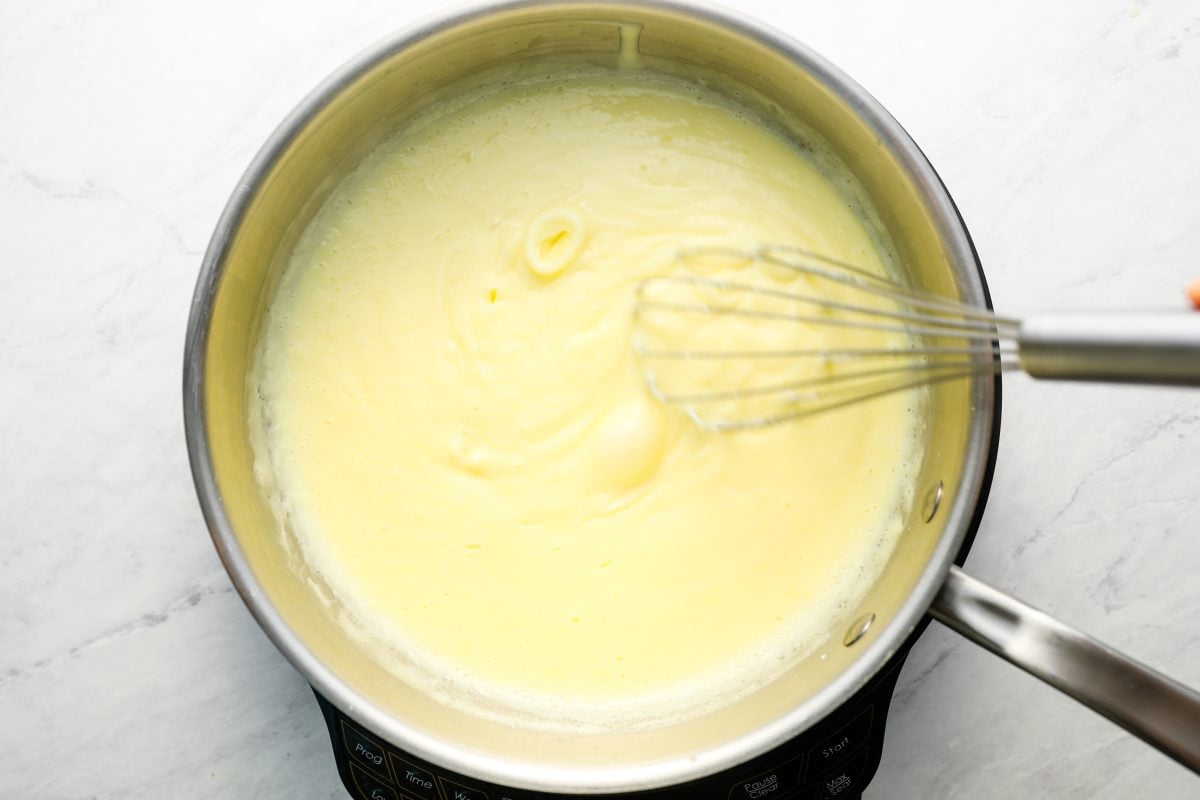
Immediately turn the heat down to a simmer and cook — whisking constantly, especially around the edges — for one minute more, until thick. (The constant stirring and low heat prevent the eggs from scrambling. Be sure to scrape the whisk against the bottom and edges of the pan where the mixture is more likely to overheat.)

Off the heat, immediately add the chopped chocolate, butter, and vanilla extract.

Whisk until the chocolate is completely melted and the mixture is evenly combined.

Pour the filling into the crust and smooth the top. Press a piece of saran wrap directly over the surface of the filling to prevent a film from forming; chill in the refrigerator for at least 8 hours or overnight.

Step 3: Make the Topping
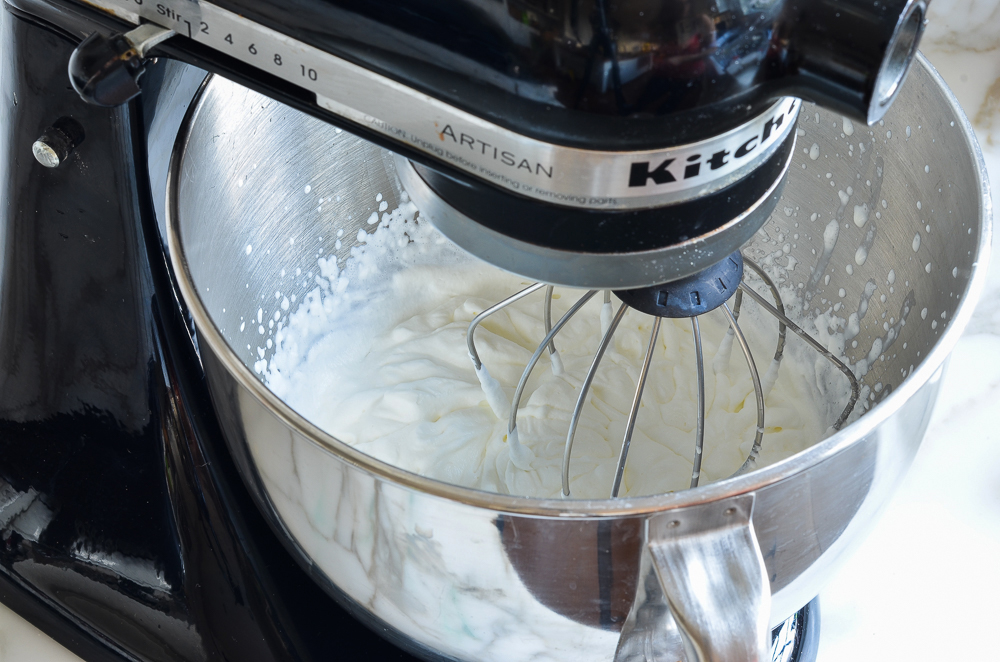
Using an electric mixer, whip the heavy cream on medium-low speed until the whisk or beaters begin to leave tracks in the cream. Add the sugar and whip until the cream holds medium, silky peaks. Go slowly towards the end; if it gets grainy or curdled, you’ve gone too far.
Spread the whipped cream over the filling, leaving some of the chocolate filling showing around the edges. Sprinkle with the grated chocolate and refrigerate until ready to serve.

Frequently Asked Questions
Yes, the crust was originally made with Nabisco chocolate wafers, but as of 2023, those cookies are no longer available. I’ve tweaked the crust a bit to use Oreos, which also work beautifully.
Sure! The pie can be assembled, without the whipped topping, up to 1 day ahead of time. Store in the refrigerator covered with plastic wrap. Wait until 3 hours prior to serving the pie to make the whipped cream.
If it’s grainy, that means it’s over-whipped and you’ll need to start over. When making whipped cream, the key is to avoid over-whipping it—whipped cream can go from perfectly silky and voluminous to grainy and curdled in an instant. You’re aiming for soft to medium peaks when the whisk is lifted out of the bowl. To avoid over-whipping, keep a close eye on it the whole time.
Video Tutorial

You May Also Like
Chocolate Cream Pie
With a cookie crust, silky pudding center and pillowy whipped cream topping, this chocolate cream pie is a chocolate lover’s dream.
Ingredients
For the Crust
- 24 Oreo cookies
- 5 tablespoons unsalted butter, melted
For the Filling
- ⅔ cup sugar
- ¼ cup cornstarch
- ½ teaspoon salt
- 4 large egg yolks
- 3 cups whole milk
- 5 ounces bittersweet chocolate, best quality
- 2 ounces unsweetened chocolate, best quality
- 2 tablespoons unsalted butter
- 1 teaspoon vanilla extract
For the Topping
- 1 cup chilled heavy whipping cream
- 1 tablespoon sugar
- 1 ounce bittersweet chocolate, grated or shaved
Instructions
For the Crust
- Preheat the oven to 350°F and set an oven rack in the middle position.
- In the bowl of a food processor fitted with a steel blade, blend the Oreos and butter until the mixture is finely chopped and evenly moistened. Firmly press the crumbs into a deep-dish 9-inch pie pan, starting by lining the sides to create a crust about ¼-inch thick, then press the remaining mixture onto the bottom to form the base. Use the bottom of a measuring cup or glass not only to flatten and even out the surface of the base but also to press against the sides, ensuring they are compact and uniform. To refine the top edge of your crust, position the side of your thumb or the edge of a measuring cup inside the crust's side wall, and with the index finger of your other hand, gently press down on the top edge. Gradually rotate the pie pan, maintaining this motion, to ensure a consistently neat and smooth edge around the entire perimeter. Bake the crust for 5 to 6 minutes, or until slightly crisp, then allow it to cool completely before filling.
For the Filling
- Combine the sugar, cornstarch, and salt in a heavy medium saucepan. Whisk gently until combined.
- In a bowl or large measuring cup, whisk together the egg yolks and milk. Add the milk mixture to the saucepan in a slow and steady stream, whisking until the mixture is smooth. Cook over medium-high heat, whisking frequently, until the mixture starts to bubble and thicken, 6 to 8 minutes. Immediately turn the heat down to a simmer and cook -- whisking constantly, especially around the edges -- for one minute more, until thick. (The constant stirring and low heat prevent the eggs from scrambling. Be sure to scrape the whisk against the bottom and edges of the pan where the mixture is more likely to overheat.) Off the heat, immediately add the chopped chocolate, butter, and vanilla extract; whisk until the chocolate is completely melted and the mixture is evenly combined.
- Pour the filling into the crust and smooth the top. Press a piece of saran wrap directly over the surface of the filling to prevent a film from forming; chill in the refrigerator for at least 8 hours or overnight.
For the Topping
- Up to 3 hours before serving, place the heavy cream in a mixing bowl. Using an electric mixer, whip on medium-low speed until the whisk or beaters begin to leave tracks in the cream. Add the sugar and whip until the cream holds medium, silky peaks. Go slowly towards the end; if it gets grainy or curdled, you’ve gone too far. Spread the whipped cream over the filling, leaving some of the chocolate filling showing around the edges. Sprinkle with the grated chocolate and refrigerate until ready to serve.
- Make-Ahead Instructions: The pie can be assembled, without the whipped topping, up to 1 day ahead of time. Store in the refrigerator covered with plastic wrap.
Nutrition Information
Powered by ![]()
- Per serving (10 servings)
- Calories: 541
- Fat: 34 g
- Saturated fat: 19 g
- Carbohydrates: 55 g
- Sugar: 40 g
- Fiber: 3 g
- Protein: 7 g
- Sodium: 274 mg
- Cholesterol: 129 mg
This website is written and produced for informational purposes only. I am not a certified nutritionist and the nutritional data on this site has not been evaluated or approved by a nutritionist or the Food and Drug Administration. Nutritional information is offered as a courtesy and should not be construed as a guarantee. The data is calculated through an online nutritional calculator, Edamam.com. Although I do my best to provide accurate nutritional information, these figures should be considered estimates only. Varying factors such as product types or brands purchased, natural fluctuations in fresh produce, and the way ingredients are processed change the effective nutritional information in any given recipe. Furthermore, different online calculators provide different results depending on their own nutrition fact sources and algorithms. To obtain the most accurate nutritional information in a given recipe, you should calculate the nutritional information with the actual ingredients used in your recipe, using your preferred nutrition calculator.



Hi! I am 14 and making this for thanksgiving! What is the easiest way to make it? I have never made a pie! I am wondering what the easiest way to make it is?
Hi Joseph, I’d just follow the directions very carefully and you should be good — very impressive that you’re making it at 14! 🙂
Can I use an 11”, ceramic tart pan (solid, not like a springform pan) for this recipe? If so, should I double the recipe or perhaps just 1.5 the amounts? Many thanks!
Hi Maureen, Yes, you can use it but I think you’d only need to make 1.5 times the recipe. Hope you enjoy!
OPPS!! Oh my! My mistake! 🙁 I see now that your photo of the Ghirardelli Chocolate Bar says “Unsweetened, 100% Cacao” … not Bittersweet! That clears things up, thank goodness.
I apologize for not checking that tiny print more carefully. Now, at last, I can begin working on your recipe … really looking forward to yummy results!! Thank you, Jen!
Hi Jen! I’m about to make your Chocolate Cream Pie as a gift for a chocolate-loving friend who is recovering from surgery. I know that I can count on a delicious result since all your recipes are real winners! But I need HELP!! I have encountered a problem! After rounding up all the ingredients, I am puzzled — the photo on your website shows a Ghirardelli Premium Baking Bar, Bittersweet, with 100% Cacao. I’m quite dismayed to see that I have the exact same Ghirardelli Premium Bar, Bittersweet, but it is labelled as 60% Cacao — how is such a difference possible under the same Bittersweet title? Surely that will make a big difference! Have they changed their product? Should I go back to the store to find something that says 100% Cacao? I want to make the pie but I am now delayed & have stopped before beginning. I would truly appreciate your help. Thank you!
Hi Toni, The recipe calls for two different types of chocolate – bittersweet and unsweetened. Underneath the unsweetened 100% cacao bar you see in the photo is the bittersweet bar with 60%. Hope that helps!
Unfortunately this was a bit disappointing. Turned out way to solid and heavy on the chocolate flavor(overpowering). Not creamy at all. Followed directions exactly. Had high expectations.
OMG.
Jen, I just cannot decide which is better, your Peanut Chocolate Tart, Coconut Cream Pie & now this!
This is such a decadent tart, very light not heavy at all (unless you’re having 2 slices!)
Jen, thank you for your wonderful recipes that put all of us ‘cooks’ in a good light as ‘chefs’!
Your recipes are amazing. Jacqui
💗
I think this is probably the best dessert recipe out of all your dessert recipes and your dessert recipes are outstanding! The chocolate cream is so decadent, rich, creamy and smooth. The whipped cream is a delicate treat on top and that cookie crust is insane! My family enjoyed every bite and it was finished on the same day. Thanks so much for these recipes!
Hi Jen,
Making the chocolate pie for friend’s birthday.
Question: Can the choc. wafer crust be made more like graham cracker crust texture so it is easier to cut through?
Thanks so much, Rose
Hi Rose, you could press the crust down a bit less firmly if you’d like. Also, if you’d like to use a graham cracker crust, that’s fine too. Hope that helps!
Hi Jenn,
Took your suggestion about not packing the crust too much and it came out perfect!!!
Thanks so much, Rose
This was far and away the best chocolate pie that I’ve ever tasted (much less made). As Ghirardelli bittersweet chocolate bars come in a 4 oz. size, I ‘borrowed’ 1 oz. left over from the unsweetened chocolate bar used in the recipe. Every single recipe I’ve made from your site and your books has been superlative, and this one was no exception. Thanks for making us all look so good in the kitchen, Jenn.
Jen! We won 2nd place at the Northwest Montana Fair Great American Pie Baking Contest with this chocolate pie recipe. First place went to a young girl who added huckleberry sauce to top her pie- so it was an interpretation situation. I’m sure if the contest had been strictly classic chocolate pie that we would have come in 1st. This is my 12th year entering pies to this contest and this is the best I have ever placed. When I collected my prize (a $200 gift certificate at local restaurant), the fair director asked my secret and I said “food blogger, Jen Segal.” He just stared at me. I don’t think he was expecting an answer like that. Lol! Thank you for being my secret weapon for years and making me look like a rockstar with each and every perfected recipe I try. Making your recipes is so fun and rewarding. You are truly a master.
💗
Love all your recipes, Jen
This pie was incredible!!!
Used 4 instead of 5 ounces bittersweet, delicious