Easy Chocolate Fudge Recipe

This post may contain affiliate links. Read my full disclosure policy.
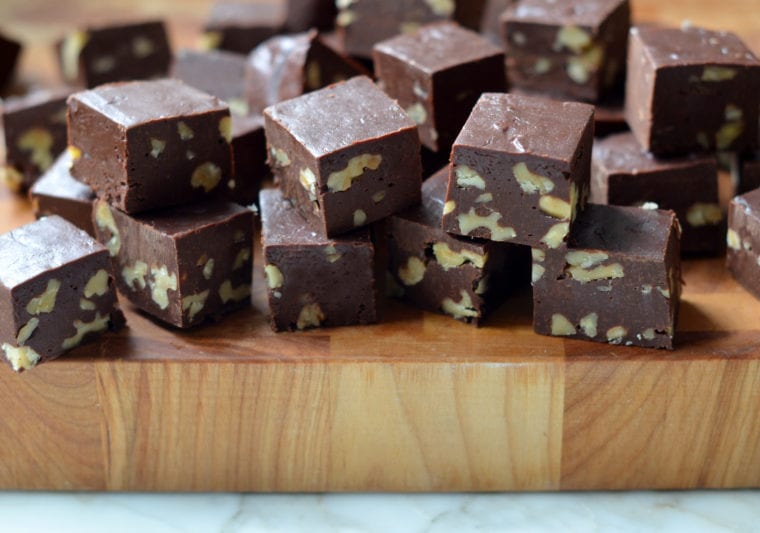
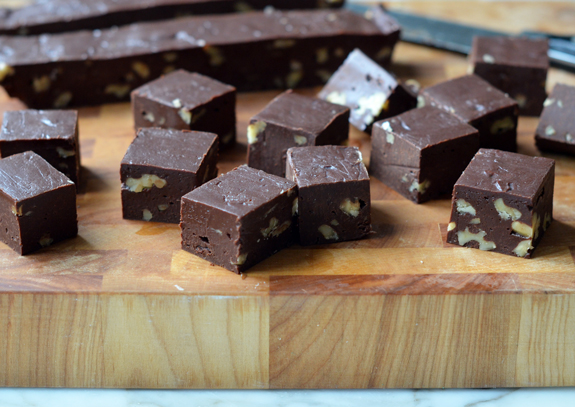
This quick and easy chocolate fudge recipe doesn’t require a candy thermometer. In just 15 minutes, you can whip up rich, creamy fudge that’s perfect for gifting over the holiday season or satisfying your sweet tooth!
My grandmother was known for making the absolute best chocolate fudge, but the process was always quite the production. Traditional fudge is fickle; it has to be heated and cooled to precise temperatures and stirred “just so” for success. For my grandparents, it was a team effort. After my grandmother would stir all the ingredients together and heat the fudge on the stovetop, my grandfather would lift the big pot off the stove, place it in the sink over a cold water bath, and then tirelessly beat the fudge with a wooden spoon until the consistency was just right.
As much as I love my grandmother’s homemade chocolate fudge, these days I usually opt for something much simpler. This 15-minute chocolate fudge recipe from Cooks Illustrated is delicious and foolproof—and you don’t need a candy thermometer or an assistant to make it. My family goes crazy for this stuff. Sometimes easy wins!
“This is probably THE BEST recipe for homemade fudge out there! The creaminess and texture rival the most upscale confectionery shops anywhere!! I humbly say this — considering myself a ‘fudge snob.’”
What You’ll Need To Make Chocolate Fudge
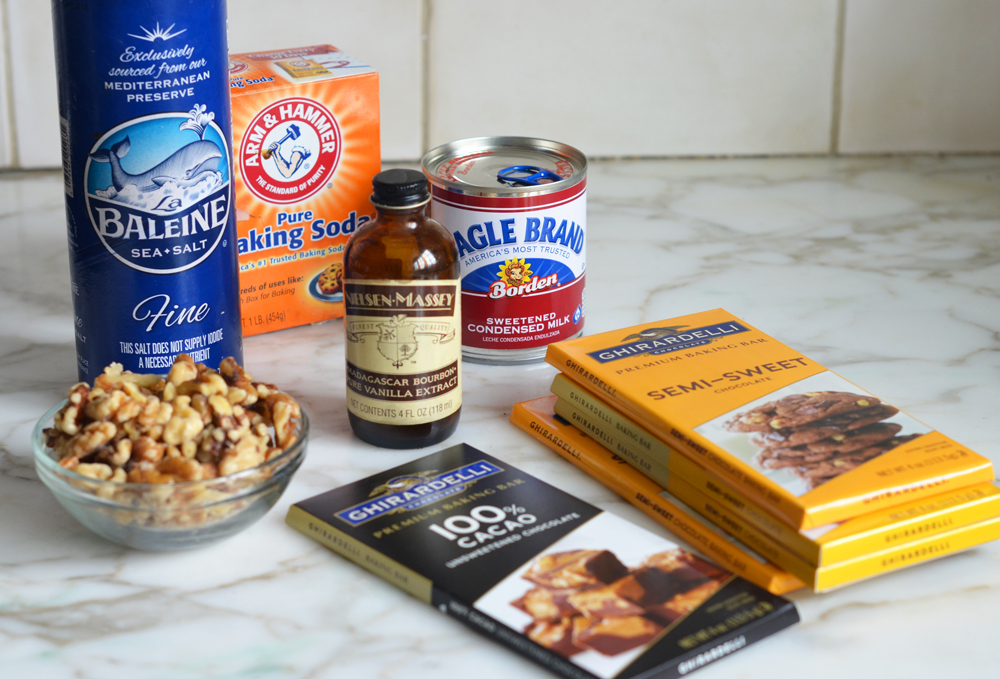
- Semisweet Chocolate: Provides a rich and sweet chocolate base. The taste of the fudge is dependent on the quality of the chocolate you start with, so be sure to use a good one. I recommend Ghiradelli.
- Unsweetened Chocolate: Adds depth and a more intense chocolate flavor.
- Baking Soda: Reacts with the acids in the chocolate to alter the pH, which makes the fudge drier and firmer.
- Sweetened Condensed Milk: Adds sweetness, moisture, and creaminess to the fudge.
- Vanilla Extract: Enhances the overall flavor and complements the chocolate.
- Walnuts: Add a crunchy texture and a rich, nutty flavor. Feel free to substitute pecans, peanuts, or whatever your favorite is.
- Jump to the printable recipe for precise measurements
Step-By-Step Instructions
Line an 8-inch square pan with aluminum foil, pushing the foil neatly into the corners and up the sides of the pan, using two pieces if necessary to ensure that the foil overlaps all edges (the overhang will help with removal from the pan). Spray the foil with nonstick cooking spray.
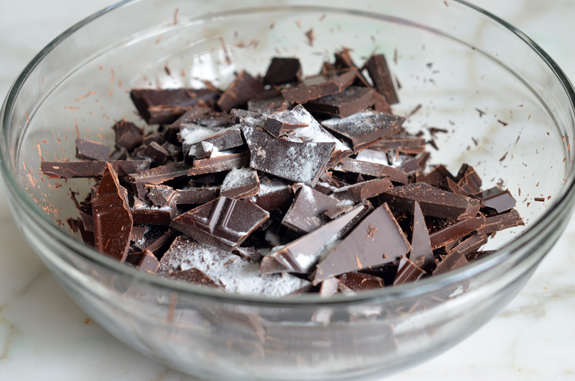
Chop the chocolate and toss it with the baking soda and salt in a medium heatproof bowl.
Stir in the sweetened condensed milk and vanilla. Then set the bowl over a 4-quart saucepan containing 2 cups of simmering water.
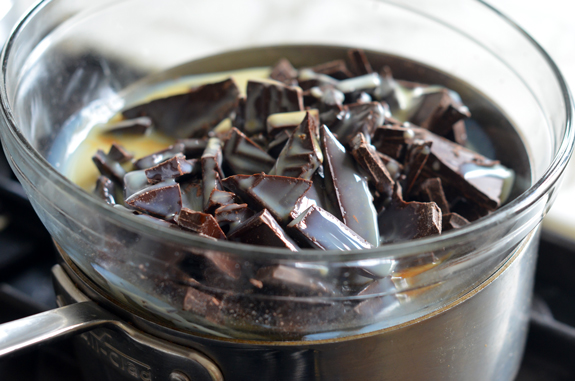
Stir with a rubber spatula until the chocolate is almost fully melted and only a few small pieces remain, 2 to 4 minutes. Make sure to remove the fudge from the double boiler before the chocolate is fully melted. If the chocolate stays in the double boiler too long, there is the possibility of the chocolate separating and producing a greasy fudge.
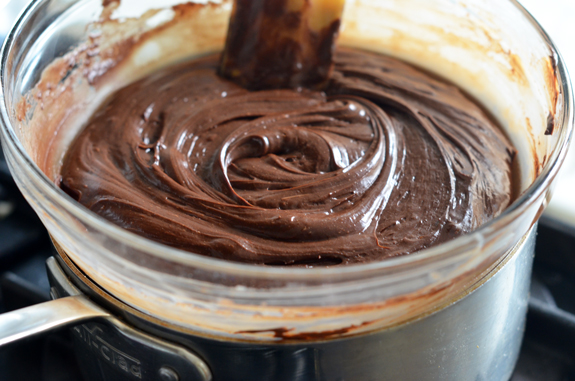
Remove the bowl from the heat and continue to stir until the chocolate is fully melted and the mixture is smooth, about 2 minutes.
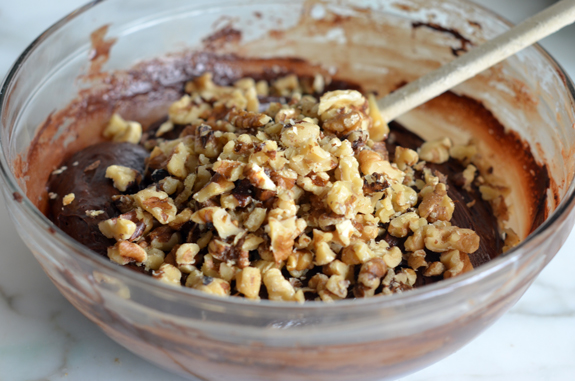
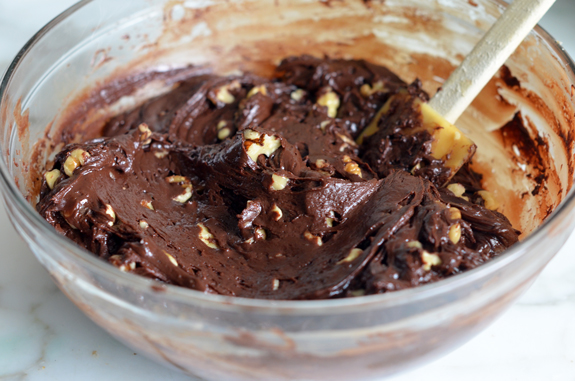
Stir in the walnuts.
Transfer the fudge to the prepared pan and spread into an even layer.
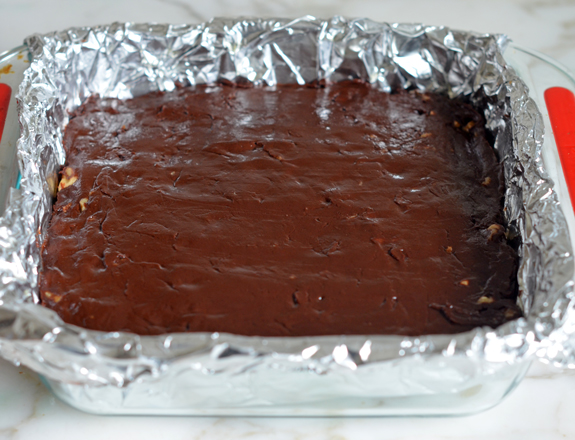
Refrigerate until set, about 2 hours. Remove the fudge from the fridge, then use the foil overhang to lift the fudge onto a cutting board. Using a sharp knife, cut into squares.
Enjoy!
Make-Ahead, Freezing & Storage Instructions
Store the fudge, tightly wrapped in plastic or in an airtight container, in a cool place for up to 2 weeks or in the freezer for 3 months. If the fudge is frozen, allow ample time for it to reach room temperature before cutting. The fudge will change in texture and become drier the longer it is stored.

You May Also Like


Easy Chocolate Fudge Recipe
This quick and easy chocolate fudge recipe doesn’t require a candy thermometer. In just 15 minutes, you can whip up rich, creamy fudge that’s perfect for gifting over the holiday season or satisfying your sweet tooth!
Ingredients
- 16 ounces semisweet chocolate, best quality such as Ghirardelli, coarsely chopped
- 2 ounces unsweetened chocolate, best quality such as Ghirardelli, coarsely chopped
- ½ teaspoon baking soda
- ⅛ teaspoon salt
- 1 (14-ounce) can sweetened condensed milk
- 1 tablespoon vanilla extract
- 1 cup coarsely chopped walnuts
Instructions
- Line an 8-inch square baking dish with aluminum foil, pushing the foil neatly into the corners and up the sides of the pan, using two pieces if necessary to ensure that the foil overlaps all edges (the overhang will help removal from the pan). Spray the foil with nonstick cooking spray.
- Toss the chocolates, baking soda, and salt in a medium heatproof bowl until baking soda is evenly distributed. Stir in sweetened condensed milk and vanilla. Set the bowl over a 4-quart saucepan containing 2 cups of simmering water. Stir with a rubber spatula until the chocolate is almost fully melted and just a few small pieces remain, 2 to 4 minutes. (Make sure to remove the fudge from the double boiler before the chocolate is fully melted. If the chocolate stays in the double boiler too long, there is the possibility of the chocolate separating and producing a greasy fudge.)
- Remove the bowl from the heat and continue to stir until the chocolate is fully melted and the mixture is smooth, about 2 minutes. Stir in the walnuts. Transfer the fudge to the prepared pan and spread into an even layer with the spatula. Refrigerate until set, about 2 hours. Remove the fudge from the pan using the foil overhang and cut into squares. Store the fudge, tightly wrapped in plastic, in a cool place for up to 2 weeks.
- To Make a Double Batch: Line a 13 by 9-inch pan; double amounts of all the ingredients; and use a large heatproof bowl and Dutch oven containing 4 cups of simmering water for melting the fudge mixture.
- Freezer-Friendly Instructions: The fudge can be frozen for up to 3 months. If frozen, allow ample time to let it reach room temperature before cutting. The fudge will change texture and become drier the longer it is frozen.
Nutrition Information
Powered by ![]()
- Per serving (64 servings)
- Serving size: 1 square
- Calories: 72
- Fat: 4 g
- Saturated fat: 2 g
- Carbohydrates: 8 g
- Sugar: 7 g
- Fiber: 1 g
- Protein: 1 g
- Sodium: 23 mg
- Cholesterol: 2 mg
This website is written and produced for informational purposes only. I am not a certified nutritionist and the nutritional data on this site has not been evaluated or approved by a nutritionist or the Food and Drug Administration. Nutritional information is offered as a courtesy and should not be construed as a guarantee. The data is calculated through an online nutritional calculator, Edamam.com. Although I do my best to provide accurate nutritional information, these figures should be considered estimates only. Varying factors such as product types or brands purchased, natural fluctuations in fresh produce, and the way ingredients are processed change the effective nutritional information in any given recipe. Furthermore, different online calculators provide different results depending on their own nutrition fact sources and algorithms. To obtain the most accurate nutritional information in a given recipe, you should calculate the nutritional information with the actual ingredients used in your recipe, using your preferred nutrition calculator.
I made this fudge last week & oh my sweet baby Jesus it’s fantastic!!!! It was easy & I secretly had to hide some away just for me. This is my go to fudge from now on, thank you for sharing!
Hi Jenn. This looks like fun to make! I saw a few people mention that roasting the nuts added something and was wondering if I could use roasted and salted nuts. Or would it be too much salt? Thanks.
Hi Jan, I think you could, but I’d eliminate the salt from the fudge recipe so it doesn’t get too salty. Enjoy!
Can use semisweet chocolate chips instead of finely chopping bar chocolate?
I wouldn’t recommend it, Kira — sorry!
Hi Jen – I followed the recipe for a double batch, keeping the water in the pan at a simmer and removing the bowl from the heat when there were still small pieces of chocolate; then I stirred the mixture off of the heat, but the chocolate still seized a bit. I’ve spread it in the pan and placed it in the fridge, but I think that I’ve ruined it. All that chocolate! Will I be able to fix the mixture if it isn’t right after refrigeration and, if so, what would the procedure and proportions of added liquid be for this particular recipe?
Hi Marna, Is it possible that some of the water from the double boiler got into chocolate mixture? That’s the only thing that might make it seize (water is the enemy of melted chocolate). Or if you used chocolate chips instead of chocolate bars, that would cause a problem. How did it turn out?
It tastes delicious (I toasted the walnuts & I think that’s key to the wonderful roasted nut taste) and it does seem smooth when cut & tasted, but there are small globs & tiny rivulets of congealed fat on the top (even after letting it sit at room temp all day) that look unappealing. I don’t want to have to redo the entire batch, but I’d like to figure out a way to minimize the appearance of the little bits of congealed fat on the top, as I want to package this for Christmas gifts. By the way, I have a couple of thoughts about why this might have happened: (1) I toasted the nuts to a golden brown & although I let them cool for about 10 minutes before they were stirred into the melted chocolate, maybe they were still too warm and raised the heat of the chocolate mixture just enough to cause it to seize a little bit; or (2) instead of all semi-sweet chocolate bars, I used 1/2 semi-sweet & 1/2 60% dark chocolate bars (+ the unsweetened per the recipe), because I wanted a truly dark chocolate end-product, so maybe there was something about the 60% dark chocolate that caused the mixture to respond differently to the heat; or (3) I live at high-altitude (6,000 feet) and, although I can’t think of why this would make a difference with this particular recipe, all sorts of crazy things can happen with recipes at high altitude. I know this is due to some error that I made – I mean, candy-making is basic science and no one else has had this problem. I have had 100% success with all of the other recipes that I have tried from your site, Jenn, and I’ve used many of them. Any ideas about: (1) what I can do to smooth out the top and get rid of the little specks of fat and/or (2) how I can prevent this from happening again?
Hi Marna, I don’t think the nuts or the bittersweet chocolate would cause the streaks of fat (not sure about high altitude). It is more likely that the chocolate was overheated. Was the bottom of the bowl possibly touching the water? It’s hard to say if it can be fixed without seeing it. Could you send me a photo at jennifer@onceuponachef.com? Thx!
I know I’m not the author, but typically you can fix seized fudge similar to how one would fix seized chocolate. I’ve had success with adding a little water and heating it back up and then proceeding with the recipe once it is smooth again. This method could dull the flavor a bit but should fix the consistency. Also, next time if you notice the fudge is seizing while still hot, I have had success adding a small amount of coconut oil or shortening. Also, adding more chocolate (similar to tempering) might work as well. Hope this helps!
This fudge is a very tasty treat perfect for the holiday season. I doubled the recipe because I wanted some without walnuts (my son is allergic to walnuts but my husband and I love walnuts). So I put peanuts I had roasted in one half and walnuts in the other half of the fudge mixture (two separate pans). After sampling both versions my husband and I were astounded that the peanut fudge tasted much better than the walnut version. In fact we could hardly taste the walnuts whereas the roasted peanut fudge was amazing. We wondered whether it was due to having roasted the peanuts and not the walnuts. So I made another batch – and guess what? The walnut flavor came to life! I know you have recommended toasting nuts in other recipes Jenn and you are definitely correct for this recipe too.
I highly recommend this recipe and well, yes, this fudge is truly 15 minute fudge because it only lasts for 15 minutes (unless you hide it!!).
Thanks Jenn!
Wow Thank you Jennifer! I had a sweet tooth today and gave this a try. I cannot imagine any fudge tasting better than this! And for it to be so easy just amazes me! Im favorite part might be the texture…Love how there is no grit and how smooth this one is! Am so happy with this! You are the best! Luanne
Very Rich , more so than we thought…
We could only eat a few..
Like most of your easy recipes….
Thanks for your sharing what you create…
This was great! I had a surplus of condensed milk in my cabinet and thought I would try this! It’s just as good as the fudge you can buy at Disney world!
This really does take 15 minutes. I did this the other night just for a treat. It keeps great in the refrig afterwards.
I added the walnuts and it was great. Try this for a treat.
Could you use mini marshmallows either instead of or in addition to the nuts?
Hi Alison, Yes definitely – Cook’s Illustrated actually has a similar “Rocky Road” recipe that calls for 1 cup salted peanuts, 1 cup mini marshmallows, and 1/2 cup chocolate chips.
This looks easy and good. Thanks Jen